2013 is a year that I am very happy to see the back of. It has been the most challenging, life changing and downright hideous year of my life. I have seen good people suffer, lose their jobs and have their lives turned upside down by no fault of their own. I have been part of a system that did not support the innocent and caused the downfall of an organisation. Yes; it has been that dramatic!!!
Whilst this year has been one to forget, I made a conscious decision midway through the drama to ensure that I could remember 2013 for something other than the year I lost my sanity. Not an easy task when your world is in shambles and your life is front-page fodder. So this is what I've done and how I will (try) to remember 2013.
I competed in a 5 km and 14 km obstacle course race (a grueling 3 hours!). After not being able to run around an oval in January, I ran 14kms yesterday. This year I have lost 21Kg’s (15Kg’s due to stress... the rest hard work!). I started a blog devoted to creating healthier dessert options.
I made an effort to make sure that my present didn't wreck my future; that would mean that the bullies would continue to win. Instead, I have ended 2013 a winner. I'm in the best shape of my life, I have 2 wonderful sons who I love and cherish more than anything, a supportive husband and a happy life.
This dessert, the Cherry Ripple Cake, is a bit like my 2013. It looks ugly; really hideous.
But go beyond the ugliness and you'll find a dessert worth waiting the year for. Decadent Chocolate Ripple biscuits smothered in Cherry Cream, topped with grated Chocolate and coconut. It tastes so good you'll want it be News Years Eve every day.
This dessert needs to be made at least 24 hours before serving. This allows for the biscuits to soften. The cream may take on a slight brown tinge if left exposed in the fridge; it will taste fine but sprinkling the chocolate and coconut on top will hide imperfections.
Make, devour and forget about the crap times that 2013 brought. This dessert will help you to remember the goodness that can come from overcoming the challenges that life throws. When life gives you lemons, make a Cherry Ripple Cake!
CHERRY RIPPLE CAKE
CHOCOLATE RIPPLE BISCUITS
Makes 18 biscuits
INGREDIENTS
2 tablespoons coconut oil
1/2 cup maple syrup
1 egg
1/2 teaspoon vanilla extract
2 tablespoons golden syrup
1 1/2 cups almond meal
1/4 cup + 1 tablespoon cocoa
3 tablespoons arrowroot
1/2 teaspoons cream of tartar
1 teaspoon bicarbonate
Pinch salt
1 tablespoon milk
INSTRUCTIONS
Combine all the wet ingredients (except the milk) in a blender and mix until combined.
Add the dry ingredients and blend until combined.
Add the milk and pulse in.
Place mixture in the fridge for a minimum 30 minutes.
Preheat oven to 175C/350F.
Place heaped tablespoons of mixture on the lined tray, at least 3cm (just over 1 inch) apart (this allows for spreading)
Place tray in fridge for 15 minutes.
Bake in oven for 16-18 minutes. The biscuits will be slightly cracked on top.
Cool on tray for 5 minutes then transfer to a wire cooling rack.
The biscuits will firm up as they cool.
CHERRY CREAM
INGREDIENTS
400 grams pitted Cherries (I used frozen)
2 Tablespoons Maple Syrup
2 Tablespoons Water
1 teaspoon Vanilla Extract
2 cans Coconut Cream, can left in fridge overnight and the thick cream used; discarding the watery remains.
2 teaspoons Vanilla Extract
2 teaspoons Maple Syrup
INSTRUCTIONS
Place the cherries, maple syrup, vanilla and water in a small saucepan and bring to a slow, rolling boil.
Decrease the heat to medium low and cook for 10-15 minutes, or until thick. Ensure that the pot is stirred regularly to prevent sticking or burning.
Use a masher or blender to break down cherries slightly if still chunky.
Allow mixture to cool.
In a bowl of a kitchen stand with a whisk attachment, add the thickened coconut cream and whisk on high until thick.
Add maple syrup and vanilla and whisk on high til combined.
Turn the whisk off and add the cooled cherry mixture.
Whisk on medium until combined.
Place the cream in the fridge and allow to thicken slightly before using.
CONSTRUCTION
Spread a small amount of Cherry Cream over a serving plate.
Spread Cherry Cream over the bottom side of 1 biscuit and top with another biscuit.
Continue spreading and stacking until you have 6 biscuits in a pile.
Place biscuit pile lengthways on the tray (so that each biscuit is in contact with the plate). The cream already on the plate will help it to stand up and stay in place.
Repeat the process 2 more times, and lay the biscuit piles next to each other on the tray.
Spread the Cherry Cream over the top and sides of the biscuit piles until the biscuits are completely covered in cream.
Cover and keep in the fridge for at least 24 hours before serving.
Sprinkle grated chocolate (link) and coconut over the top of the desert and serving tray.
Slice and serve.


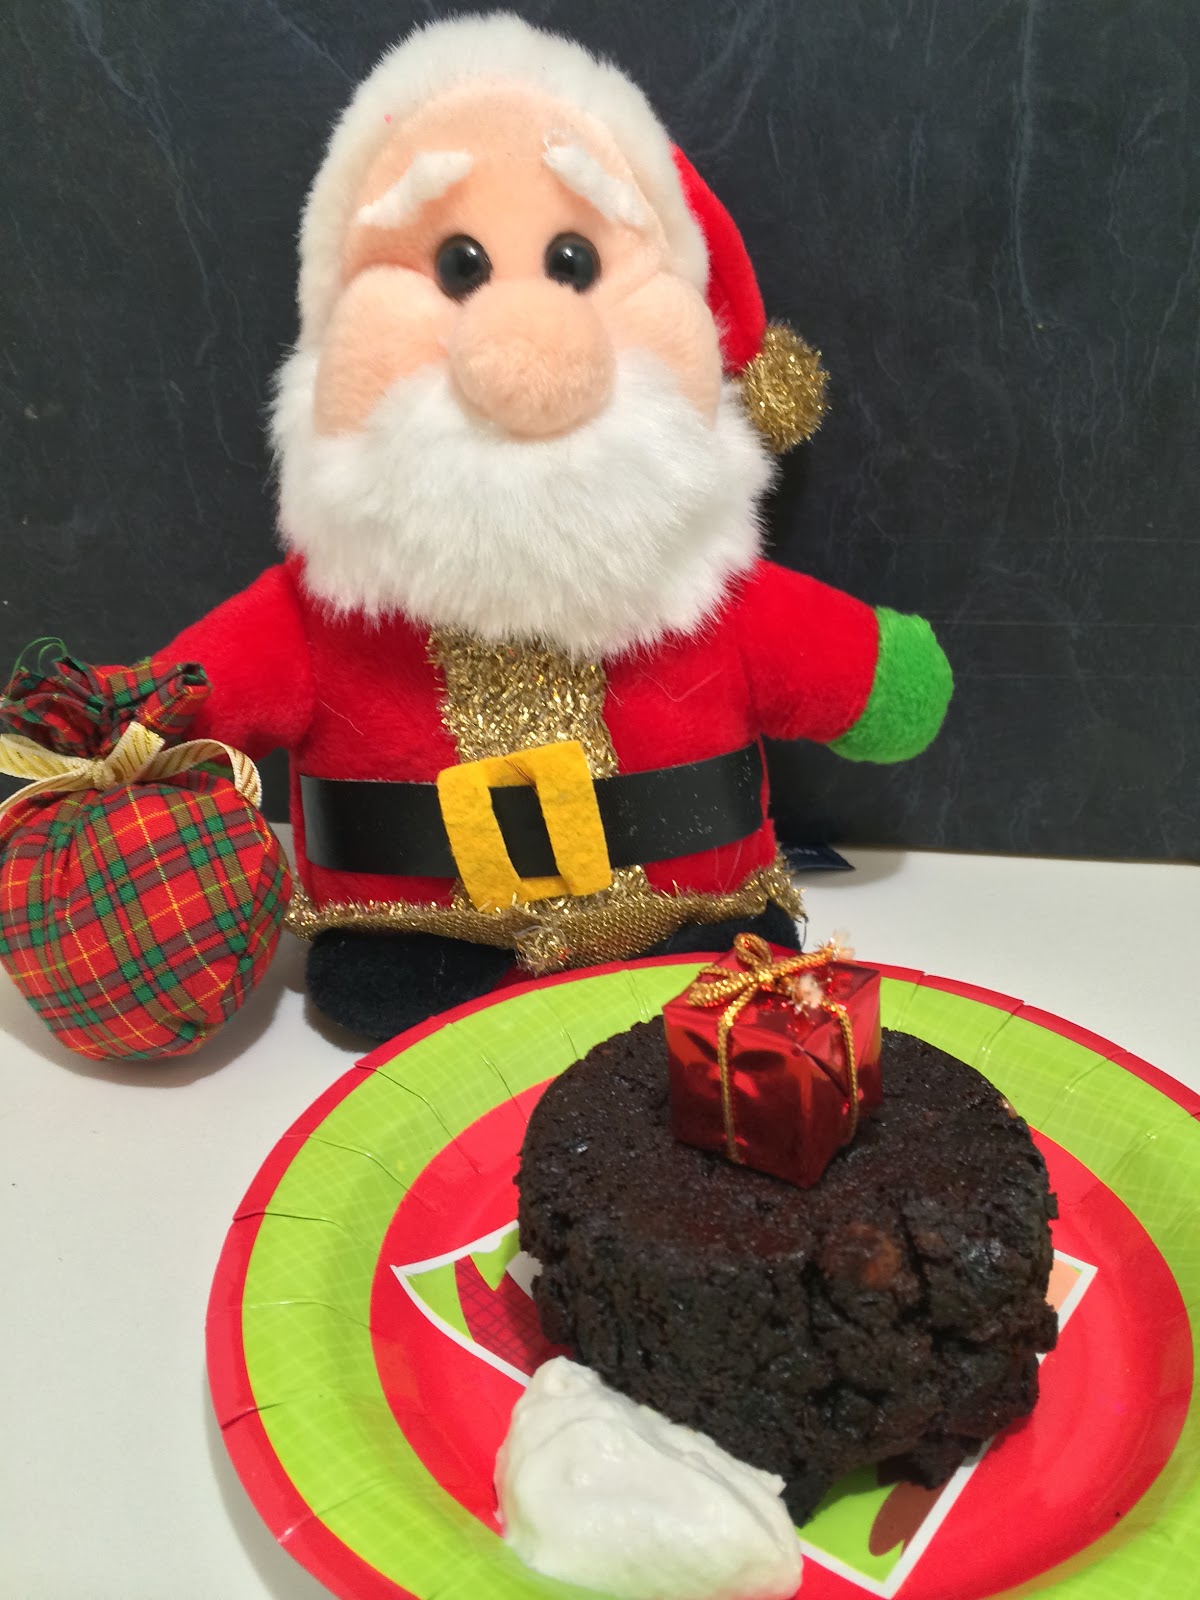
Merry (belated) Christmas!
This is my final post in the 12 recipes of Christmas Series.
It is my favorite, and the one that I am most proud of!
My family ate this pudding for Christmas lunch and it was just like a 'normal' Christmas pudding. The taste, the smell, the texture; it was all there!
It was also all there when I ate more at dinnertime!
The pudding is such an iconic part of a Christmas meal. It right up there with Turkey and the post dinner nap. For me it wouldn't be Christmas without pudding, despite the fact that our climate here in Australia isn't always conducive to a hot dessert.
Thank you for allowing me to share my Christmas recipes with you.
Christmas cooking is a tradition that has been passed down to me from my Mother and Grandmother. I love to give baked goods to people as gifts during the festive season, and even more so now when they later discover what they actually ate!
I hope you have enjoyed your Christmas and I look forward to creating more Christmas goodness for next year!
CHRISTMAS PUDDING
INGREDIENTS
1 cup Dates
1/2 cup Boiling Water
200 grams Mixed Dried Fruit
1/2 cup Port/Sherry
1/4 cup Golden Syrup
300 grams Dates, chopped
1 cup Boiling Water
1 teaspoon Bicarb Soda
4 eggs, separated
200 grams Chickpeas, canned and drained
2 Tablespoons Coconut Flour
1 Tablespoon Arrowroot
2 cups Almond meal
1 teaspoon Baking Powder
2 teaspoons Mixed Spice
2 teaspoons Ground Ginger
Optional; 2 Tablespoons Brandy/Rum for brushing
INSTRUCTIONS
Place 1 cup of dates in a small bowl and cover with 1/2 cup of boiling water.
Leave to sit for 20 minutes.
Place softened dates in a blender and purée.
In a sealable container place the dried fruit, port, golden syrup and puréed dates.
Stir the contents of the container and place the lid on tightly.
Store in a dark, cool cupboard for at least overnight, but up to 6 weeks.
(NB; I left mine in the cupboard for 1 month, shaking the container every few days)
To make Pudding:
(this can be done on the day of serving or ahead of time. The pudding will keep, covered, for up to 3 days or can be double wrapped and frozen)
Place the dates in a small bowl and add the boiling water and bi-carb. Allow to sit and soften for at least 20 minutes.
Place the egg whites in the bowl of a kitchen stand mixer with a whisk attachment.
Whisk the egg whites on high until medium peaks form.
Add the puréed dates and continue to whisk.
Add the egg yolks and whisk for 1 minute.
Place the chickpeas in a blender (or use a hand blender) and process until they have broken down.
Add the almond meal, coconut flour, arrowroot, baking powder and spices and blend until combined.
Add the dry mixture to the eggs and stir in until combined (alternatively whisk on low)
Add the fruit mixture to the combined mixture and stir in until combined (alternatively whisk on low).
Take a 2 litre (8 cup capacity) pudding bowl and grease the sides of the bowl.
Place a small piece of baking paper on the bottom of the basin and grease it also.
Pour the mixture into the pudding bowl, smoothing the top for a flat surface.
Place another piece of baking paper on the pudding and screw on the lid.
Place the pudding bowl inside a large saucepan, sitting it on top of a trivet or small plate.
Pour water into the saucepan, ensuring it comes 3/4 of the way up the edge of the pudding bowl.
Bring the water to the boil and simmer on medium/low, with lid on, for 5 hours.
Check the water levels regularly to ensure that they are 3/4 of the way up the edge of the pudding bowl.
After 5 hours remove the pudding bowl from the saucepan and allow to sit for 10 minutes.
Remove the lid and run a knife around the edge of the pudding to ensure it can be easily removed.
Invert pudding onto a serving tray.
Brush the pudding with the optional Brandy if desired.
If serving immediately pour the Salted Toffee Sauce (see recipe below) over the top of the pudding, allowing it to drip down the edges of the pudding.
Serve with Brandy Custard (see recipe below) and/or Whipped Coconut Cream.
Pudding can be stored for up to days and then reheated.
Reheat pudding by placing the pudding back into a greased/lined (as above) pudding bowl and simmering in a large saucepan (as above) for 1 hour.
Slices of pudding can be warmed in the microwave.
Pudding can be double wrapped and frozen also.
SALTED TOFFEE SAUCE
INGREDIENTS
1/2 cup Dates
1/4 cup boiling water
Dash Bi-carb Soda
2 Tablespoons Golden Syrup
100 ml coconut cream (the thickened part from the top of a chilled can)
1/2 cup Whipped Coconut Cream (link)
1/2 teaspoon salt flakes
INSTRUCTIONS
Place the dates into a small bowl and cover with boiling water and add the bicarb.
Allow to sit and soften for at least 20 minutes.
Plate the date mixture, golden syrup and coconut cream in a blender and purée.
Pour the purée mixture into a small saucepan and, over a medium heat, stir until bubbling.
Reduce the heat to low and add the whipped coconut cream and cook, stirring occasionally for 7-10 minutes, or until slightly thickened.
Stir in the salt and allow to sit for 5 minutes.
Pour over the top of the pudding.
Alternatively, it can be served individually as a sauce.
BRANDY CUSTARD
(Adapted from the Australian Better Homes and Gardens Magazine)
INGREDIENTS
1/3 cup dates
2 1/2 Tablespoons Boiling Water
Dash of bi-carb
500 ml milk (of choice)
200 ml Coconut cream (the thick part removed from the top of a chilled can)
1 teaspoon vanilla extract
6 egg yolks
3 Tablespoons Arrowroot
1 Tablespoon Brandy
INSTRUCTIONS
Place the dates in a small bowl and cover with the boiling water.
Add the bicarb and allow to sit and soften for at least 20 minutes.
Purée in a blender.
Place the milk, cream and vanilla in a saucepan and bring to a simmer over a medium heat. Remove from the heat.
In a separate bowl whisk together the egg yolks, purée dates and arrowroot until smooth and combined. Pour in 1 cup of the warmed milk mixture and whisk until smooth and combined.
Add the egg yolk mixture to the reaming milk in the saucepan and return to the heat.
Cook over a low heat for 6-8 minutes, or until thickened.
Add the brandy and stir to combine.
Serve immediately or refrigerate for up to 3
I made too much fruit mince. After making many mince pies and fruit mince cupcakes I STILL had 1/2 a jar left.
This is how the gingerbread fruit mince biscuits came to be; as a use for left overs!
I must confess; this was not my idea. I recall seeing it somewhere, but for the life of me I can't find the original concept anywhere. It would also work with stars or hearts; but trees are just so Christmassy.
Feel free to substitute another biscuit recipe. I chose this recipe as it contains no eggs and is vegan friendly.
GINGERBREAD FRUIT MINCE BISCUITS
Makes approximately 14
GINGERBREAD
(you could use this or this recipe, but I chose this one as it is also vegan friendly.
INGREDIENTS300 grams Almond Meal
200 grams Arrowroot flour
Dash Salt
1/2 teaspoon Bicarb
1 Tablespoon Ground Ginger
100 grams coconut oil, softened slightly
125 grams dates
65 ml boiling water
300 grams Golden Syrup
INSTRUCTIONS
Preheat the oven to 170C/340F
Place the dates in a small bowl and cover with boiling water.
Allow to sit for a minimum of 20 minutes (the longer the better).
Place the dates in the blender and process on high until a paste forms.
Add the golden syrup and blend on high for 3 minutes.
In a separate bowl lightly whisk together the dry ingredients.
Add the dry ingredients to the wet and blend until combined.
Add the coconut oil in small pieces and blend on high until combined (1-2 minutes).
Wrap the dough in plastic wrap and leave in the fridge for 1 hour.
Pre heat the oven to 170C/350F.
Remove the dough from the fridge and roll out between 2 layers of greased baking paper.
Use a Christmas Tree cookie cutter and cut out an even number of shapes.
Place 1/2 the trees on the lined and greased baking tray.
Dollop a spoonful of fruit mince (recipe below) onto the middle of each tree.
Place another tree on top of the mince, gently pressing the edges of the 2 trees together.
Complete for all the trees.
Place the baking trays with completed gingerbread fruit mince trees in the fridge for 20 minutes.
Bake in oven for 18-20 minutes,or until lightly browned on top.
Leave the biscuits in the tray to cool for 30 minutes then transfer to a wire cooling rack.
FRUIT MINCE
(this makes HEAPS! Use the left overs in mice tarts, mince pie cupcakes)
INGREDIENTS
500g mixed dried fruit
1 apple, grated
50 grams dates
25 ml boiling water
Dash of bicarb
1 tablespoon Marmalade
1 teaspoon Ground Ginger
1 teaspoon Cinnamon
1 teaspoon Mixed Spice
125ml Port or Sherry
125 Water
65ml Brandy
INSTRUCTIONS
Place the dates in a bowl, cover with the boiling water and add the bicarb.
Allow to sit for 20 minutes then blend until puréed.
Place all the fruit mince ingredients, including the date mixture, into a large saucepan.
Bring to the boil over a medium heat, then turn to low and simmer for 1 hour.
Blend slightly to combine all the ingredients using a hand mixer.
If you are making the mince in advance store in warmed glass jars.
Keep in a dark and cool cupboard, shaking occasionally.
Can keep for up to 1 month.


I spent much of my university years working in retail (I did also attend classes... just thought I should point that out!), and Christmas was the most loved and hated time of a shop assistants year.
Christmas meant lots of work; which meant more money. It was the time of the year when we could afford to eat more than just 2-minute noodles and didn't have to drink the nastiest Vodka ever to leave the Bundy grocery store. That was the love part. More work = more money = better booze.
Christmas meant lots of work; which meant lots of customers, many suffering from too much Christmas stress, long hours on your feet and way too many fake smiles. This was often the hate part. More work = more chance of encountering a nutty customer = pulling your hair out as you hold your breath trying to swallow the words you really want to say (as opposed to the "of course the customer’s always right").
Luckily the bonuses of extra work helped to deal with the issues of the extra work!
So next time you are at the shops and in a rush to get something, just remember that the retail assistants are people too. They've probably encountered more rude people that day than you have in your whole year. So why not give them a smile, compliment their cheesy Christmas T-shirt that they've been forced to wear and wish them festive greetings. God knows they need it; the Boxing Day sales start soon and they are a NIGHTMARE!
How lovely does this Gingerbread man wreath look?! (Sorry no clever segue... it's too hot and I'm too buggered to think about it)
It's actually quite simple to do and looks impressive. If you are game you can also use Chocolate gingerbread dough and have alternating men.
GINGERBREAD MAN WREATH
Makes approximately 34 5cm gingerbread men; enough for 2 medium size wreaths
(Adapted from Martha Stewart)
INGREDIENTS
1/2 cup Dates
1/4 cup Boiling Water
1 3/4 cups Almond Meal
3/4 cup Arrowroot
4 Tablespoons Coconut flour
1/2 teaspoon Bicarb Soda
1/4 teaspoon Baking Powder
2 teaspoons ground Ginger
1 teaspoon Cinnamon
3/4 teaspoon Cloves
1/2 teaspoon Pepper
3/4 teaspoon Salt
1 egg
1/2 cup Golden Syrup
1/4 Coconut Oil, slightly softened.
INSTRUCTIONS
Place dates into a small bowl and cover with boiling water.
Allow to sit for at least 20 minutes.
Place all the dry ingredients into a bowl and gently whisk to combine.
Place dates in a blender and purée.
Add the golden syrup, egg and coconut oil and blend until smooth and combined.
Add the dry ingredients to the wet and process until combined.
Separate the dough into 2 segments. Form each into a disc, wrap in plastic and refrigerate for 1 hour. At this point the dough can be left in the fridge for up to 3 days, or frozen (if freezing double wrap each disc and thaw to room temperature before using).
Preheat the oven to 175C/350F.
Trace a circle using a plate onto a piece of baking paper.
Turn baking paper over, place in large tray and grease paper (make sure you can see the circle outline).
Remove 1 disc at a time. The dough needs to stay firm to cut out the shapes. As the dough softens during the cutting return it to the freezer for 5-10 minutes. The dough will not hold its cut shape if the dough becomes too soft.
Roll the dough disc between 2 pieces of greased baking paper to 6mm (approx. 1/4 Inch) thickness. Cut out gingerbread men shapes and place them on the tray, lining the arms of the men up with the traced circle and overlapping the hands and feet.
Continue cutting, returning the dough to the freezer when it becomes too soft, until the circle is complete.
Use a small brush to apply a small amount of water to the arm and feet joins of the circle.
Place the tray with the wreath in the freezer for 15 minutes.
Remove from the freezer and bake for 17-19 minutes.
If baking normal Gingerbread men the cooking time should remain the same.
Allow the wreath to cool on the tray.
It's hot. Christmas in Australia is HOT!
Today was 38C (that's about 100F if you are a White Christmas person), and tomorrow is predicted to be even hotter.
So what does an intelligent woman like myself do on a hot day such as this? Turn the oven on and bake! Ok, so maybe intelligent isn't the right word to use...crazy (that's already been established!), obsessed, gingerbreadaholic?
I promised 12 recipes for Christmas and I will deliver! I'm even wearing my Mrs Claus apron to help get in the spirit.
Today's recipe is really a cheats dessert. It's for the kids (and the big kids at heart), and is perfect for when you need individual servings. And it's cute!
This idea has been floating around the Internet for years; I have just healthified it.
REINDEER BISCUIT TARTS
MAKES 18
(recipe can be easily divided for a smaller number of tarts)
Make each of the biscuits, frosting and Marshmellow
BUTTERNUT SNAP BISCUIT
See recipe here
Once biscuits have cooled;
Preheat the oven to 175C/350F.
Grease a muffin tray and place a biscuit over the top of each hole.
When the oven has come to temp, place the tray in the oven for 3 minutes.
Remove the tray and gently press and mould each biscuit into the holes whilst still hot.
Allow the biscuits to cool in the tin.
CHOCOLATE FROSTING
See recipe here
Spoon frosting into the biscuit cups.
Set in fridge.
MARSHMALLOW
See recipe here
Spread Marshmallow mixture in a baking tray.
Once set use 2 round cutters (1 larger than the other) to cut out 1 nose and 2 eyes for each reindeer.
Place eyes and nose on the frosting.
Use 1/2 a sultana as each eye ball and a glacé cherry/raspberry/craison etc as Rudolph's nose.
Use a cut pecan (or something else that resembles antlers) for the antlers and wedge into the frosting next to the eyes.
Set the tarts in the fridge before serving.
Christmas comes with it but many perks. Presents, parties, days off work and the often forgotten Christmas Movie. Christmas movies, just like gifts from Nanna, can be a bit of a mixed bag.
It's probably easier to start with some simple rules;
- If it 'stars' (and I use that word loosely!) Tim Allen then give it a miss.
- Any movie with an old action hero (or ex Governor) isn't worthy of your time.
- Just because they made a sequel doesn't mean the original movie deserved it.
- Movies with multiple small plot lines are often confusing, but as long as Hugh Grant is in it it doesn't matter if it doesn't make sense.
- There will always be at least one nauseating Christmas Carol scene, so make sure to plan your bathroom break around that time.
Christmas movies are cheesy, full of 'insights' and usually have an impossibly happy ending with a PG snog scene. They make you smile and, most importantly, they make you believe in Christmas. It doesn't matter how long the queues at the shop where or that someone stole your last festive mint, when a C-grade celebrity starts to sing 'Santa Claus is coming to town' your worries don't seem as bad any more. It may just be that you realized that your life isn't as bad as the once famous person who now has to wear red tights and sing Yuletide hymns.
If these mini Puddings where a Christmas movie it would star Hugh Grant with his floppy hair, an enchanted reindeer that sings carols and at least one scene with a snow ball fight.
It would be magical!
These Puddings are delicious served with Whipped Coconut Cream, and can be eaten hot or cold.
MINI CHOCOLATE FRUIT MINCE PUDDINGS
Makes 8 individual serves
Adapted from this recipe
INGREDIENTS
1 cup Dates
1/2 cup boiling water
2 cups Mixed Dried Fruit
1 cup Raisins/Sultanas
1/2 cup Golden Syrup
3/4 cup Water
1/4 cup Apple Sauce (see recipe below)
1 1/2 cup Almond Meal
1/2 cup Coconut Oil, melted
1/2 cup + 2 Tablespoons Cocoa
2 Tablespoons Maple Syrup
1 Tablespoon Vanilla Extract
1/4 cup Coconut Flour
3 teaspoons Mixed Spice
1 teaspoon Bicarb Soda
INSTRUCTIONS
Preheat the oven to 175C/350F
Grease an 8 hole Texas Muffin tray (bigger holes the a normal muffin tin) or 8 small ramekins.
Place the dates in a small bowl and cover with the boiling water. Allow to sit for a minimum of 20 minutes.
Place the Fruit, Raisons, Golden syrup, Apple Sauce and 1/4 cup water in a saucepan and bring to a boil.
Simmer the fruit mixture for 5 minutes, then allow to cool.
Blend dates until puréed.
Add the cooled fruit mixture to the dates and pulse until finely chopped.
Transfer the mixture to a large mixing bowl.
To the mixing bowl, add the melted coconut oil, 1/2 cup water, almond meal and maple syrup and stir until combined.
Sift the cocoa, coconut flour, spices and bicarb over the bowl and gently fold together.
Evenly divide the mixture between the muffin holes/ramekins.
Bake for 40-45 minutes, or until cooked through.
Remove from the tin and serve immediately with Whipped Coconut Cream (link).
Alternatively, they taste great cold too!
You can make these up to 3 days ahead and reheat in the microwave.
APPLE SAUCE
INGREDIENTS
4 apples, peeled and cut into small pieces
3/4 cup water
INSTRUCTIONS
Place apples and water in saucepan. Cover with lid.
Bring to boil, then simmer for 7-10 minutes, or until apple is soft.
Store in fridge.

Woo-freakin-hoo!!! I did it!
A gluten, dairy, processed sugar free Gingerbread house that tastes amazing!
And not just amazing because I haven't had real Gingerbread in so long but truly fantastic!
I ate so much of this yesterday... and again today!
The Gingerbread will not keep as long as a store bought house, not that you'll be able to stop eating it anyway! Choose whichever healthier decorations you like. I used nuts, glacé cherries, dried apricots that I cut into shapes using cookie cutters, coconut and home made jellies. The choices are endless.
I have used this mold but there are many commercially available. Alternatively I have included links to templates that you can print and cut out.
My secret with this Gingerbread house is the 'glue'. Ordinarily Royal Icing would be the cement that joins the walls, but sadly that is not a healthy option. Instead, in a moment of insanity, I decided to use Gingerbread Cookie Dough Frosting. Yep, cookie dough and Gingerbread. Amazing! The frosting needs to be refrigerated to ensure it stays firm and holds the house together. You can also use honey/golden syrup to adhere some of the lighter decorations.
Make this and enjoy!

GINGER BREAD HOUSE
Makes 1 House using mold.
Alternatively bake in a tray and cut house shapes
INGREDIENTS
300 grams Almond Meal
200 grams Arrowroot flour
Dash Salt
1/2 teaspoon Bicarb
1 Tablespoon Ground Ginger
100 grams coconut oil, softened slightly
125 grams dates
65 ml boiling water
300 grams Golden Syrup
INSTRUCTIONS
Preheat the oven to 170C/340F
Place the dates in a small bowl and cover with boiling water.
Allow to sit for a minimum of 20 minutes (the longer the better).
Place the dates in the blender and process on high until a paste forms.
Add the golden syrup and blend on high for 3 minutes.
In a separate bowl lightly whisk together the dry ingredients.
Add the dry ingredients to the wet and blend until combined.
Add the coconut oil in small pieces and blend on high until combined (1-2 minutes).
Press the dough into the Ginger bread house mold.
Alternatively bake in a tray and use these templates to cut house pieces.
Templates for Gingerbread houses can be found here and here.
The dough should be approximately 7-10mm thick (1/3 Inch).
Bake for 20-25 minutes, or until golden brown.
Remove from oven, but do not remove pieces from the mold until cooled.
Construct the house using Gingerbread Cookie Dough Frosting (see recipe below) as the glue. Use the frosting on the base of the pieces (to stick to tray) and edges to join walls.
Decorate with dried fruits, nuts, jellies, Marshmallow; using the frosting to adhere the decorations to the walls.
Alternatively, use golden syrup or honey to help stick the decorations to the walls.
Spread golden syrup/honey over the serving tray and sprinkle desiccated coconut to look like snow.
Sprinkle desiccated coconut over the top of the house for the snow.
Place finished house in the fridge to set the frosting.
If you live in a hot or humid environment you may need to keep the house in the fridge so the frosting doesn't become soft.
GINGERBREAD COOKIE DOUGH FROSTING
INGREDIENTS
150 grams Almond Meal
100 grams Arrowroot
90 grams Golden Syrup
65 grams dates
33 ml boiling water
1/2 Tablespoon Ground Ginger
50 grams Coconut oil
1to 2 Tablespoons Whipped Coconut Cream
INSTRUCTIONS
Place the dates in a small bowl and cover with boiling water.
Allow to sit for a minimum of 20 minutes (the longer the better).
Place the dates in the blender and process on high until a paste forms.
Add the golden syrup and blend on high for 3 minutes.
In a separate bowl lightly whisk together the dry ingredients.
Add the dry ingredients to the wet and blend until combined.
Add the coconut oil and blend on high until combined (1-2 minutes).
Transfer the mixture to the bowl of a kitchen stand mixer with a whisk attachment.
Add 1 Tablespoon of whipped coconut cream and whisk until fluffy.
If the mixture is too dry add more cream.
Place the frosting in the fridge to firm up, ensuring that it is still spreadable.

I saw a sign at the gym yesterday that said "Don’t try to lose weight over the festive season, just try to maintain your weight". I thought this was sound advice. With so many parties, fruitcakes and glasses of eggnog it's easy to develop some extra Christmas cheer around the middle.
But then I thought about this in practical terms. In order to maintain your current weight (and let's say that there has been no recent changes in weight) then food input and exercise would have to remain the same. If we assume that exercise is continuing then it will have to be through diet that weight remains unchanged.
Simple? Yes, but in order to fit in all the Christmas goodies you'll have to forego morning cereal and lunchtime sandwiches. Forgot about stirfrys and pasta bakes for dinner; it's turkey and puddings all the way!
An example:
Breakfast; mince pies with a side of brandy cream (some fruit there!)
Morning tea; the front door of the gingerbread house
Lunch; Chocolate Cherry cake with cherry cream... and some bacon on the side! (as the day of the week ends with Y then it must be a bacon day!)
Afternoon tea; 1,maybe 2, White Christmas Crackles; they are only mini ones after all!
Dinner; Roast Turkey with a side of Chocolate Christmas Pudding.
I don't think this is what the gym meant when they put their message on the wall, however it might be the only way to ensure all that Christmas goodness doesn't go to waste!
This recipe has been a surprising hit. Each White Christmas recipe I found was slightly different, so adapting one to a healthier version allowed a lot of scope. This one is adapted
from Kellogs.
WHITE CHRISTMAS CRACKLES
Adapted from Kellogs
Makes 23 mini crackles
INGREDIENTS
1/3 cup Coconut Oil
1/4 cup Maple Syrup
1/2 cup dried mixed fruit
1/2 cup desiccated Coconut
1 Sachet (equivalent to 50grams or 1/2 cup) of Coconut Milk Powder
1 1/2 cups Rice Bubbles
23 glacé cherries for decoration
INSTRUCTIONS
Line a tray/plate with mini cupcake liners (or use large ones if desired)
Over a very low heat melt the coconut oil.
Add the maple syrup and stir.
In a large bowl combine the fruit, coconut, coconut milk powder and rice bubbles and stir to mix.
Pour in the warmed mixture and stir until combined.
Spoon mixture evenly into liners and place a cherry on the top.
Alternatively, spread into a lined tray and cut into slices once set.
Refrigerate until set (minimum 2 hours).
Keep in the fridge when not serving.

Last week we took the boys to see Santa. We TRIED to create a lasting family moment. I should have known it wasn't going to happen!
One summer I worked as Santa’s helper taking Santa Claus photos. It was my job to capture the joy and excitement of Christmas and provide families with a lasting treasure...
The reality was a bit less rom-com and a lot more horror movie.
It's unrealistic to except a child, who has been schooled all year in stranger danger, to sit on a fat, strange mans knee and smile. Even if they’re not screaming and kicking poor Santa, the likelihood of getting everyone to smile at the same time - and face the camera - is not great. We had screamers, biters and kickers; we had the ones who wouldn't go anywhere near the old man and the ones who wouldn't leave; we had toddlers in tutus and babies with stinky poo!
But through all the dramas it's Santa who is the real trooper. It would be easy to develop a self-esteem issue when every 2nd person who sees you screams and cries, or 'industrial deafness' from the incessant whining. It is Santa who works so hard to make each child smile and give them a joyous experience. It's not his fault that some kids are just shits!
Santa deserves a reward after he's navigated through the stars and down the blocked chimney. Why not leave him some Rocky Road Marshmallow with his cold beer? (the cold beer might be an Australianism - it can be 40C at Christmas time and the poor obese man isn't in the best shape)
You might call this a deconstructed and reconstructed version of Rocky Road. Feel free to add the options you like, or have handy in the cupboard.
ROCKY ROAD MARSHMALLOW
INGREDIENTS
1 Egg White
3/4 cup Maple Syrup/Honey
200ml water
2 Tablespoons Gelatin
2 Tablespoons Cocoa, unsweetened
3 Tablespoons each Arrowroot and Cocoa
Options;
1-1/2 cups Biscuit pieces
3/4-1 cup Desiccated Coconut
3/4-1 cup dried cranberries/raspberries etc
1/2- 3/4 cup Nuts (macadamias, pecans etc)
1/2 Chocolate Chip Pieces
INSTRUCTIONS
Place the egg white in a clean bowl of a stand mixer with a whisk attached.
Pour 100ml of water into a small bowl/cup and sprinkle gelatin over. Allow to sit and thicken for a minimum of 5 minutes.
Pour the Maple Syrup and 100ml of water into a saucepan and bring to a slow boil.
Once boiling, add the gelatin mixture and whisk to combine.
Bring to the boil again and boil for 30 seconds.
Turn the whisk onto medium and pour the hot mixture down the side of the mixing bowl.
Once added turn to high and whisk for 5 minutes.
Turn off and sift Cocoa over Marshmallow mixture.
Return the whisk to high and whisk for 6-8 minutes, or until the Marshmallow fluffs up and becomes thick.
Add the selected options and fold into Chocolate marshmallow mixture.
Pour mixture into a lined tray/casserole dish (the size/depth of the tin will determine the size of your Marshmallows) and leave at room temperature for a minimum of 4 hours.
Cut the Marshmallow into pieces or cut into shapes using cookie cutters.
Combine additional cocoa and arrowroot, and roll each piece of Marshmallow in it (this prevents it from being too sticky).
Store in an airtight container at room temperature for up to 3 days.

My godlike-idol crush on Martha Stewart always grows at this time of year. Can the woman do no wrong?! (Clearly this is a rhetorical question as her past issues are well documented, however I choose to focus on the Martha who wears knitted reindeer jumpers not prison garb)
I think Martha Stewart must be an alien. She obviously exists in a different universe; one where there are far more than 24 hours in a day and dust does not exist. A parallel time that intersects with ours during this festive season so that alien Martha can bring forward the gifts of inspiration, perfection and creativity. The world of Martha (where surely she is Queen) has clean benches, full vases and everyone smiles. There is a faint odor of baked cookies and fir trees in the air, and no one ever gets angry. Why would you? Queen alien Martha would just bake you a cake if you even looked like getting sad.
Planet Martha was the inspiration for these cookies. A take on the classic Gingerbread, these Chocolate Gingerbread Cookies are a great gift. Why not make a Christmas tree tower with frosting to join?!
NB it's worth noting that Star Trek DS9 was on whilst I was writing this post... this may explain my ramblings!
CHOCOLATE GINGERBREAD COOKIES
(adapted from www.marthastewart.com)
Makes approximately 16-18 gingerbread men.
INGREDIENTS
1/3 cup + 1 Tablespoon Dates
50ml boiling water
Dash of Bicarb
1 egg
1/4 cup Golden Syrup
1/2 Tablespoon fresh, minced Ginger
3 Tablespoons Coconut Oil, softened
2/3 cup Almond Meal
1/3 cup Arrowroot
1 Tablespoon Coconut Flour
1/4 cup Cocoa
1/4 teaspoon Ground Ginger
1/4 teaspoon Nutmeg
1/2 teaspoon Cinnamon
Dash of Cloves
Dash of Salt
1/4 Teaspoon BiCarb Soda
1/4 Teaspoon Baking Powder
INSTRUCTIONS
Place dates in a bowl and cover with boiling water, adding the bicarb.
Allow to sit for at least 20 minutes, or until softened.
Place softened dates in a blender and process on high until broken down.
Add egg, golden syrup, fresh ginger and coconut oil and blend until well combined.
In a separate bowl whisk together the remaining, dry ingredients.
Add the dry ingredients to the wet in the blender and process until combined and the dough forms.
Remove dough from blender and form it into a flat disc.
Wrap in glad wrap, and place in the fridge for 1 hour (the dough can be left overnight a this stage).
Preheat the oven to 175C/350F.
Remove the dough and place between 2 sheets of baking powder and roll flat to approximately 5mm (1/4 inch) thickness.
Cut out desired shapes and place on a lined and greased baking tray.
Whilst cutting the shapes, if the dough becomes too soft and the cookies don't hold their shape place the dough in the freezer for 10 minutes and start the process again.
Place the trays of cut cookies in the fridge for 20 minutes
Bake the cookies for 10-13 minutes (10-11 minutes for gingerbread men, 11-13 for bigger shapes).
Remove from oven and allow to cool on the tray for 10 minutes before transferring to a wire rack.

I am surrounded by boys. Stinky boys. 1 Husband, 2 sons, 2 male dogs.
Sometimes I need to let my inner girl out. Exert some pinkness over the masculinity.
Until this year we had a PINK Christmas Tree. Yep... a shiny, girly, pink tree with lots of ballerina, princess and shoe ornaments! Sadly, over the years the pink turned to grey and the tree turned more senior-cit than girly. Now we have a green tree... But it's still adorned with sparkly handbag ornaments!
These Mince Pies are a great alternative to a traditional favorite... A bit like a pink tree!
The pastry is best when it is baked first before it is filled with mince as it ensures that the crust is not doughy and soft
CHRISTMAS MINCE PIES
(makes between 6 to 12, depending on size of the pies)
FRUIT MINCE
Makes heaps! But you can use the leftovers when you make a 2nd batch of pies, or in the Mince Pie Cupcakes
INGREDIENTS
500g mixed dried fruit
1 apple, grated
50 grams dates
25 ml boiling water
Dash of bicarb
1 tablespoon Marmalade
1 teaspoon Ground Ginger
1 teaspoon Cinnamon
1 teaspoon Mixed Spice
125ml Port or Sherry
125 Water
65ml Brandy
INSTRUCTIONS
Place the dates in a bowl, cover with the boiling water and add the bicarb.
Allow to sit for 20 minutes then blend until puréed.
Place all the fruit mince ingredients, including the date mixture, into a large saucepan.
Bring to the boil over a medium heat, then turn to low and simmer for 1 hour.
Blend slightly to combine all the ingredients using a hand mixer.
If you are making the mince in advance store in warmed glass jars.
Keep in a dark and cool cupboard, shaking occasionally.
Can keep for up to 1 month.
PASTRY
Adapted from Against All Grain
INGREDIENTS
1/4 cup almond flour
1/2 cup plus 2 tablespoons coconut flour
1/4 teaspoon salt
1/4 teaspoon baking soda
1/4 cup coconut oil, softened
1/4 cup honey or maple syrup
1 egg
1 teaspoon vanilla
INSTRUCTIONS
Combine the dry ingredients in a kitchen blender and process on low until combined.
Add the wet ingredients and blend until the dough comes together.
Remove dough from the blender and form 2 balls.
Flatten each ball into a disc, wrap in plastic and place in the fridge for 30 minutes.
Pre-heat the oven to 175C/350F
Roll a disc of pastry between 2 pieces of baking paper (this prevents the pastry sticking to the rolling pin).
Cut out circles to fit inside your pie cases and cut stars for the tops.
** I used cute little fluted pie tins and used an egg ring as my pastry cutter. You could also use a pie or cupcake tin. The choice of tin will depend on the number of pies you are able to make**
Grease the pie tins and place the the cut circles in the tin. Press the pastry into the tin, pressing together any cracks or tears.
Pierce the bottom of the pastry 4-5 times.
Place in the oven for 7 minutes.
Remove and use immediately.
Fill the pie crusts with fruit mince and top with the star cut pastry.
Bake for a further 12 minutes.
Remove from the oven and allow to cool.
Keep in an airtight container.
It's nice to know that even cupcakes make an appearance at Christmas time.
It really wouldn't be a celebration without cupcakes!
These are adult Christmas Cupcakes. We have given them as gifts, and of course eaten many ourselves! A party of 1 can is still a cupcake occasion... or is that just sad?
They arose as I had left over fruit mince from the Mince Pies, but are by no means a left over dessert! They are really good... and the cream is a decadent addition!
MINCE PIE CUPCAKES
Makes 6 cupcakes and heaps and heaps of cream.
Adapted from Good to Know
FRUIT MINCE
(this makes HEAPS! Use the left overs in Christmas Mince Pies
INGREDIENTS
500g mixed dried fruit
1 apple, grated
50 grams dates
25 ml boiling water
Dash of bicarb
1 tablespoon Marmalade
1 teaspoon Ground Ginger
1 teaspoon Cinnamon
1 teaspoon Mixed Spice
125ml Port or Sherry
125 Water
65ml Brandy
INSTRUCTIONS
Place the dates in a bowl, cover with the boiling water and add the bicarb.
Allow to sit for 20 minutes then blend until puréed.
Place all the fruit mince ingredients, including the date mixture, into a large saucepan.
Bring to the boil over a medium heat, then turn to low and simmer for 1 hour.
Blend slightly to combine all the ingredients using a hand mixer.
If you are making the mince in advance store in warmed glass jars.
Keep in a dark and cool cupboard, shaking occasionally.
Can keep for up to 1 month.
CUPCAKES
INGREDIENTS
65 grams Chickpeas, (canned and drained)
1/4 cup coconut flour
1 teaspoon Mixed Spice
2 teaspoons baking powder
1/2 teaspoon baking soda (bicarb
1/4 cup dates
30ml boiling water
Dash of salt
1 Tablespoon Maple Syrup
1 teaspoons vanilla extract
2 tablespoon maple syrup
1 teaspoon vinegar
INSTRUCTIONS
Pre heat oven to 180C
Place the dates in a bowl with the boiling water and bicarb and allow to sit for at least 20 minutes. Once softened, place the mixture in the blender and purée.
Place drained chickpeas in clean blender and purée.
To the blender, add coconut flour, baking powder, spice and salt. Blend on high until ground into a fine mixture.
To a mixing bowl with the whisk attachment on, add the egg whites and whisk on high until frothy.
Add the puréed dates and whisk in high.
Add vanilla, maple syrup and finally egg yolks and mix on high.
Add the blended mixture (chickpeas etc) and whisk on low for 1 minute. You may need to scrape the sides of the bowl during this step to ensure it is combined properly.
Add milk and vinegar and mix on medium until combined (this won't take too long).
Place 6 cupcake liners in muffin tray and spray liners with oil spray.
Place a spoonful of mixture in each liner.
Place a teaspoon of fruit mince in the middle of each cupcake liner.
Top with more cupcake mixture and smooth the top.
Bake for 18 minutes, or until cook through.
Remove from oven and allow to cool.
Once cooled
Use a small star cutter (or a knife to make a small circle cut out) cut a small piece of the top of the cupcake and remove.
Spoon Brandy Mince Cream (see below) onto the cupcake and top with cut segment of cake.
Keep in fridge.
BRANDY MINCE CREAM
INGREDIENTS
1 Can Coconut Cream, can opened and left in fridge overnight.
150 grams Fruit Mince
1 Tablespoon Brandy(optional)
2 teaspoons Vanilla Extract
2 teaspoons Maple Syrup
INSTRUCTIONS
Spoon thickened Coconut Cream from the can, discarding the watering remains.
Place the cream, Brandy, Vanilla and Maple Syrup in the bowl of a kitchen stand mixer with a whisk attachment.
Whisk on high until thickened (5 minutes).
Add fruit mince and whisk on medium until combined.
Store in fridge (will thicken as it gets colder)