I've been reading up lately on how to be an awesome blogger with a kick ass website.
Apparently I've made many mistakes (thankfully none blog-fatal), have broken most 'golden rules' and no one will read my blog for at least another 2 to 5 years.
So, I need to write about relevant topics for my future readership in 2016-2019.
By then my 10th Gen iPad, with mind reading capabilities, will compose my blog posts for me. This may cause them to be randomly interspersed with musings about the smurfs or shoes. Coconut Flour will be grown on the back of a mouse so it will be a bit cheaper, although I'll stand on a kitchen chair and squeal every time I use it. My right bicep will be noticeably larger because of 2-5 years of Coconut Cream can shaking and there are now 25 different flavors of whipped coconut cream.
Yep... just broke 2 more rules in that paragraph alone!
This Nutella Pudding Cookie Dough Tart was inspired by Love and Olive Oil. It looked so pretty and bringing together cookie dough and nutella is inspired. I have made many changes from the original (notably making it Gluten, Dairy and Processed Sugar Free, Paleo), and have used Chocolate Pudding instead of Brownie. This way it contains a vegetable and therefore can be justifiably eaten for dinner... and then again for dessert!
NUTELLA PUDDING COOKIE DOUGH TART
Inspired by Love and Olive Oil
TART CRUST
Adapted from Against All Grain
INGREDIENTS
1/4 cup almond flour
1/2 cup plus 2 tablespoons coconut flour
1/4 teaspoon salt
1/4 teaspoon baking soda
1/4 cup coconut oil, softened
1/4 cup honey or maple syrup
1 egg
1 teaspoon vanilla
50 grams Chocolate Chips (see recipe below to make Chocolate and then break into chips)
INSTRUCTIONS
Pre-heat the oven to 175C/350F.
Grease and line the bottom of a 20cm/8 inch springform tin (or a pie dish of the same size)
Combine the dry ingredients in a kitchen blender and process on low until combined.
Add the wet ingredients and blend until the dough comes together.
Press the dough into the tin, pressing the dough up the edges of the tin to create a wall.
Pierce the bottom of the pastry 4-5 times.
Place in the oven for 7 minutes.
Remove from the oven and allow the pie crust to cool.
NUTELLA PUDDING
INGREDIENTS
230 grams Sweet Potato, baked-measured after baking (to bake: cut sweet potato into small pieces and place in a moderate oven for 40 minutes)
1 tablespoon Coconut flour
1/2 cup Coconut Oil, melted
3/4 cup Cocoa, unsweetened
1/4 cup plus 2 tablespoons Maple Syrup
3 Eggs
2 teaspoon Vanilla Extract
1 teaspoon Baking Soda
dash of Salt
1/4 cup of Nutella (see recipe below)
2/3 of the Cookie Dough recipe (below)
INSTRUCTIONS
Preheat oven to 160C/325F
Place sweet potato in blender and mix until a puree forms.
Add all other ingredients and mix until blended and smooth.
Pour the pudding mixture over the cooled chocolate biscuit base.
Place the nutella in a small saucepan and warm over a low heat until it softens.
Evenly pour the softened nutella over the pudding.
Make small discs (about the size of your thumb nail) with the cookie dough and place evenly over the nutella.
Place the tart in the oven and bake for 30 minutes, or until the cookie dough is slightly browned and the pudding has set.
Allow the tart to cool before serving.
Cover and store in the fridge...maybe hide it right at the back so one one else finds it and you can eat it all yourself.
COOKIE DOUGH
INGREDIENTS
1/3 cup Maple Syrup
1 Egg
2 teaspoons Vanilla Extract
1 cup Almond Meal
1 cup Arrowroot Flour
2 Tablespoons Coconut Flour
11/2 teaspoons Baking Powder
Dash of Salt
3 Tablespoons Coconut Oil, softened
INSTRUCTIONS
Place the maple syrup, egg and vanilla extract into a blender and mix (this can also be done in a kitchen stand mixer or by hand).
Add the dry ingredients and mix until combined.
Add the coconut oil and mix until the dough comes together.
If not using the dough immediately place in the fridge (but allow it to return to room temperature before using).
NUTELLA
This will make more than enough for the tart with left overs for midnight munchies.
INGREDIENTS
2 cups raw Hazelnuts (240g)
1 1/2 tablespoon pure Vanilla Extract
1/4 cup Cocoa
1/4 cup plus 3 tablespoon Maple Syrup
1/4 teaspoon salt
1/2 cup milk (almond, coconut)
INSTRUCTIONS
Roast hazelnuts for 8-10 minutes at 200C/ 400 F.
Rub them together in a paper towel to get the skins off. (It’s ok if a few stubborn skins won’t come off.)
In a food processor, blend the nuts until they’ve turned to butter.
Add all other ingredients and blend a long time until smooth.
Keep refrigerated.
CHOCOLATE
INGREDENTS
1 1/2 Tablespoons Coconut Oil
2 teaspoons Maple Syrup
1 1/2 Tablespoons Cocoa
INSTRUCTIONS
Place the coconut oil in a small saucepan over a very low heat and melt.
Whisk in the maple syrup and cocoa.
Stir until combined.
Pour into a small, lined tray (or plate etc) and freeze for a least 30 minutes.
Today I ran my first Half Marathon.
It was awesome! I blitzed my 10km PB and ran the HM quicker than I had done 20km in training. WOO HOO! I've only taken up running regularly over the last year and started distance training 4 months ago so I'm very proud of my results (hence this has turned into a brag post opposed to a blog post!).
Running and exercise (as well as this blog!) have helped me to get through some pretty tough times. The distraction, the endorphins and the sense of satisfaction in achieving something you thought was impossible have helped me deal with feelings of anxiety, inadequacy and stress. All those months of training, the 6am wake ups and chafing are all worth it when you cross the finish line!
Someone recently described me as manic (I chose to take this as a compliment-not sure it was intended this way!) but I prefer dedicated, strong minded and driven. You say obsessed; I say focused. You say crazy; I say passionate!
Training for the 1/2 Marathon has taught me a lot about how to train. Up until now it was a question of "if" we could finish; now it's "how fast". Training doesn't have to be about hours of running at a time; speed, variance and stamina are all important. So now I have a new goal to train for and a new program to do it... and yes it probably does make me slightly manic that I had this done 2 hours after my race!
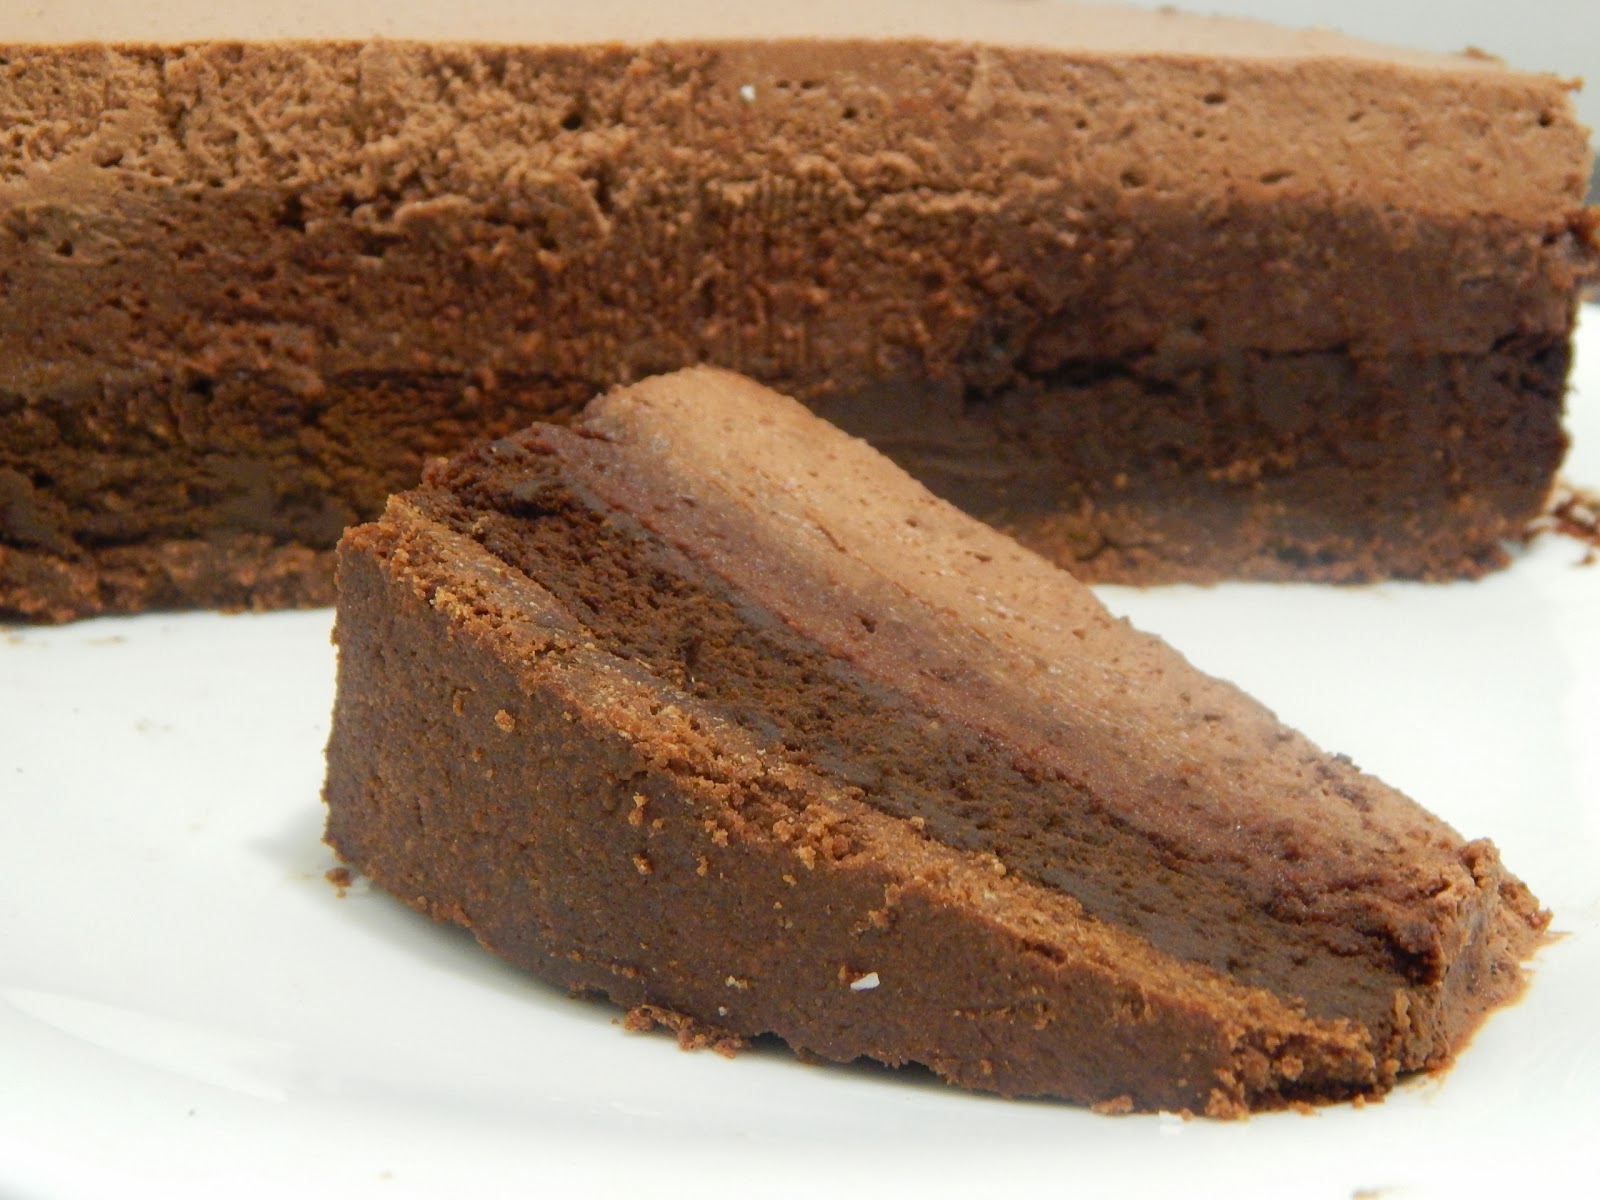
This dessert; this amazing, decadent, chocolatey masterpiece (did I mention I’m modest?!) was our reward for crossing the finish line. So was the Strawberry Donut Trifle but that was entree so it can hardly count as dessert.
It is amazing. It's soft layers melt in your mouth as you devour multiple pieces.
You'd never guess that there was no gluten, no dairy and no processed sugars.
You'd never be able to tell that inside the cake was 2 sweet potatoes, a cup of chickpeas and dates. SHHHHHH! Let's keep all that to ourselves so when everyone is saying "no" to having seconds you can (guilt free) dive straight back in for another... and save the left overs for later!
This cake comprises 4 layers. The pudding is cooked on top of the previously cooked biscuit base. The cookie dough mousse can be made ahead of time, however the cream needs to be spread as soon as it is made. This cream is being 'stabilised' by the gelatin. This means it will set and hold its shape once the springform tin is removed. It does not set firm like jelly does, but more like a dense mousse.
Make, enjoy and reward yourself for achieving your goals!
DEATH BY CHOCOLATE - 4 LAYER MOUSSE CAKE
This cake has 4 layers. Make them in the order listed.
CHOCOLATE BISCUIT BASE
INGREDIENTS
1/4 cup almond meal
1/2 cup coconut flour (available from health food and specialty stores)
2 tablespoons unsweetened cocoa
1/4 teaspoon salt
1/4 teaspoon baking soda
1/4 cup coconut oil, softened
1/4 cup maple syrup (you could substitute honey etc)
1 egg
1 teaspoon vanilla
INSTRUCTIONS
Preheat the oven to 175C (350F).
Grease/Spray and line a 20cm/8 inch springform cake tin.
If you don't have a springform tin make the lining very long on all sides to enable the dessert to be lifted out. I have not tried this method but in theory it should work. I would highly recommend a springform tin.
Mix the dry ingredients in a blender.
In a separate small bowl, whisk together the wet ingredients.
Pour the wet ingredients into the dry, and blend until combined.
Press the dough flat into the bottom of the tin. DO NOT go up the edges.
Pierce the dough several times with a sharp knife.
Bake for 7 minutes.
Remove from the oven and allow to cool completely.
CHOCOLATE PUDDING
INGREDIENTS
230 grams Sweet Potato, baked-measured after baking (to bake: cut sweet potato into small pieces and place in a moderate oven for 40 minutes)
1 tablespoon Coconut flour
1/2 cup Coconut Oil, melted
3/4 cup Cocoa, unsweetened
1/4 cup plus 2 tablespoons Maple Syrup
3 Eggs
2 teaspoon Vanilla Extract
1 teaspoon Baking Soda
dash of Salt
INSTRUCTIONS
Preheat oven to 160C/325F
Place sweet potato in blender and mix until a puree forms.
Add all other ingredients and mix until blended and smooth.
Add to cooled chocolate biscuit base and bake for 27 minutes.
Cake should still be slightly gooey when removed from the oven.
Allow to cool before placing in fridge.
Leave in fridge for a minimum of 1 hour before adding the Cookie Dough Mousse Layer.
CHOCOLATE COOKIE DOUGH MOUSSE
INGREDIENTS
1 cup Dates
1/2 cup boiling water
Dash of Bicarb Soda
1 cup Chickpeas; canned, drained and then measured
4 Tablespoons Maple Syrup
4 teaspoons Vanilla Extract
1 1/3 cup Almond Meal
2/3 cup Arrowroot Flour
6 Tablespoons Cocoa
dash Salt
INSTRUCTIONS
Place the dates in a small bowl and cover with the boiling water and the bicarb.
Allow to sit for at least 20 minutes.
Place the dates in a blender and purée.
Add the chickpeas, maple syrup and vanilla extract and blend until a smooth paste is formed.
Add the dry ingredients to the blender and mix until combined.
Add the milk and blend until combined.
A delicious cookie dough mousse will form.
Ensure that the ring of the springform tin is still attached to the the tin.
Spray the exposed edges of the tin.
Spread the cookie dough mousse over the pudding layer.
Flatten the top with a knife or spatula to ensure an even finish.
Place in the fridge to firm up before putting the cream on top.
CHOCOLATE CREAM
INGREDIENTS
1 can Coconut Cream, can opened and left in the fridge overnight (will be approx. 1 1/2 cups of cream). If you measure 2 cups increase the gelatine to 2 1/4 teaspoons, or if 1 cup open a 2nd can. You will need 1 1/2 cups to spread evenly on the cake.
2 Tablespoons Cocoa
1 1/2 Tablespoons Maple Syrup
2 teaspoons Vanilla Extract
1 3/4 teaspoons Gelatin
INSTRUCTIONS
Remove the can of coconut cream from the fridge and spoon out the thickened cream from the top of the can into a kitchen stand mixer bowl fitted with a whisk attachment (or use a hand blender).
Retain the watery remains from the can. Measure 2 Tablespoons of the watery remains and put into a small bowl. Sprinkle the gelatin over the water and allow to stand and thicken.
Add the maple syrup, vanilla extract and cocoa to the cream and whip until thick (allow between 5-10 minutes).
Add the gelatin mixture and whip until incorporated.
Evenly spread the Chocolate Whipped Cream over the Cookie Dough Mousse.
Place the dessert in the fridge to set for at least 4 hours (overnight is preferable).
Serve straight from the fridge.

Things that seem so wrong together but somehow just work.
• Cheese Doritos, Peanut butter and Milo (don’t judge me til you’ve tried it!)
• Fun and Run in the same sentence.
• Bacon and Chocolate
• Michael Jackson and Lisa Marie Presley (OK, maybe a bad example)
• Musical episodes and Buffy
• Chilli and Chocolate
• Doogie Howser and adult comedy (legend...wait for it....non-dairy!)
• Chocolate, Chickpeas and Carrots
Yep, that’s what I said. CHOCOLATE, CHICKPEAS and CARROTS.
No, I’m not going crazy. No, I haven’t joined some odd cult that only makes you eat Oscar the Grouch’s left-overs. I’m serious; and soon you’ll want to find a cult that eats only this dip. It’s that good!
This dip can be used as a frosting on cupcakes, as a mousse in a cake or trifle or as a dip with carrots, celery, biscuits, bread or even wraps. Personally I prefer my fingers; that means I have 10 perfectly good (clean) swipes at the dip before I have to grab the bunny sticks.
There is no egg in this recipe so it is safe to eat and the normal raising agents aren’t required as it is not being baked.Quick, simple and your friends will have NO idea they’re eating chickpeas, no processed sugar or gluten. Why, it’s practically a health food! Share it around or, (as I may have done) hide it and hoard it for yourself!
CHOCOLATE COOKIE DOUGH DIP (or Frosting or Mousse!)
INGREDIENTS
1/2 cup Dates
1/4 cup boiling water
Dash of Bicarb Soda
1/2 cup Chickpeas; canned, drained and then measured
2 Tablespoons Maple Syrup
2 teaspoons Vanilla Extract
2/3 cup Almond Meal
1/3 cup Arrowroot Flour
3 Tablespoons Cocoa
dash Salt
1 Tablespoon Milk (of choice)
INSTRUCTIONS
Place the dates in a small bowl and cover with the boiling water and the bicarb.
Allow to sit for at least 30 minutes.
Place the dates in a blender and purée.
Add the chickpeas, maple syrup and vanilla extract and blend until a smooth paste is formed.
Add the dry ingredients to the blender and mix until combined.
Lastly, add the milk and blend (if you want a runnier dip add milk an extra teaspoon at a time until the right consistency is reached).
A delicious cookie dough will form.
The dip can be eaten right away, or stored in the fridge. The dip will firm slightly in the fridge.
Eat with a spoon or a carrot, spread on celery, use as frosting for cakes or as a mousse.
Just EAT IT!
My 2 boys are part cookie dough and part pork crackling. They were my 2 main nutrient sources whilst pregnant.
I remember carrying a tub of cookie dough in my handbag during my first trimester and sneaking secret spoonfuls when no one was looking. At home I could be more open about my addiction... sitting on the couch in my trackies, with a bowlful of cookie dough and a soup spoon (because a dessert spoon just isn't big enough and a ladle seemed unladylike) watching Buffy DVD's (and for those you gasping at the thought of food poisoning- it was egg free dough!).
Had I had this recipe 5 years ago then perhaps I wouldn't have 2 (almost) 10-pound babies and maybe now I would be able to run down a hill without having to cross my legs. Awkward; yes, worth it; of course!
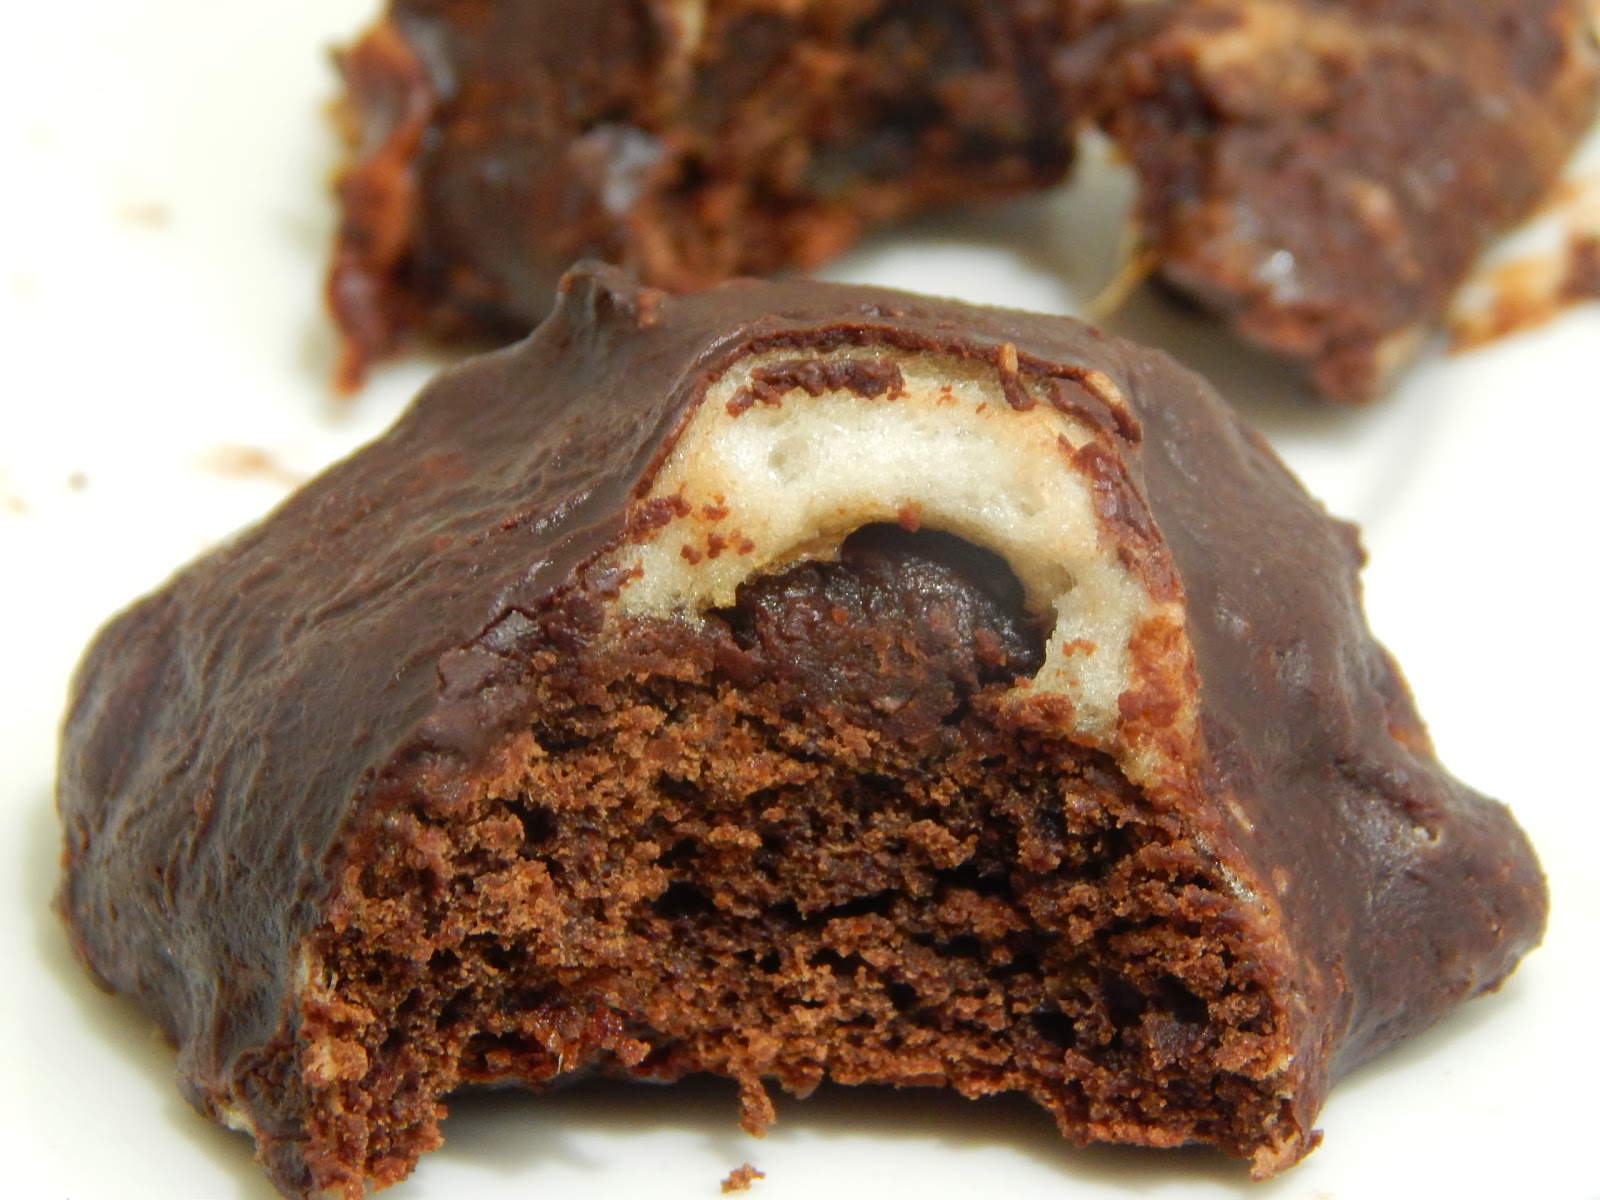
These Surprise Chocolate Cookies are really a double surprise; marshmallow under the Chocolate coating and chickpeas in the cookie. Super Surprise! Not only will these cookies help those hormonal induced cravings, they'll help keep you regular (chickpea fibre!).
These make great treats for the kids and being gluten, dairy and processed sugar free its ok if they have more than one... As long as they don't eat into your stash!
SURPRISE CHOCOLATE COOKIES
Makes 12 Cookies
INGREDIENTS
1/2 cup Dates
1/4 cup boiling water
Dash of Bicarb Soda
1/2 cup Chickpeas; canned, drained and then measured
2 Tablespoons Maple Syrup
2 teaspoons Vanilla Extract
2/3 cup Almond Meal
1/3 cup Arrowroot Flour
3 Tablespoons Cocoa
1 Egg
1/2 teaspoon Baking Powder
dash Salt
1 serve Marshmallow (there will be heaps left over but its not easy to make a 1/2 recipe on account of the egg white. Eat the rest or make a 1/2 recipe of Salted Honey Rice Krispie Treats)
Chocolate (see recipe below)
INSTRUCTIONS
Preheat the oven to 175C/350F
Line and grease a large baking tray.
Place the dates in a small bowl and cover with the boiling water and the bicarb.
Allow to sit for at least 20 minutes.
Place the dates in a blender and purée.
Add the chickpeas, maple syrup and vanilla extract and blend until a smooth paste is formed.
Add the egg and blend in.
Add the dry ingredients to the blender and mix until combined.
A delicious cookie dough will form.
Using a dessert spoon, scoop spoonfuls of dough onto the tray.
The spoonfuls will form round balls on the baking tray.
Will make 12 biscuits.
DO NOT FLATTEN THE BALLS.
Place in the middle rack of the oven and bake for 16 minutes.
The cookies will be firm on the bottom and top, but still soft (not gooey) in the middle.
Remove from the oven and allow to cool on the trays.
Whilst the cookies are cooling cut the Marshmallow into squares; with each square being the same size as the top of the cookie.
Place the Marshmallow on top of the cooled cookie and, using a kitchen blow torch, lighter etc, lightly melt the marshmallow. If the Marshmallow starts to 'run' down the side of the cookie use a knife to spread it back on top.
If the Marshmallow becomes too soft then it will seep into to the cookie and the only surprise you'll get is that there isn't any surprise!
Once the Marshmallow is adhered to the cookie and has re-firmed, place the cookies on a wire cooling rack which rests over a baking tray.
Melt the chocolate and pour over the marshmallow cookie.
Reuse the Chocolate that has dripped into the baking tray.
Place cookies in the fridge to set.
Store in an airtight container in the fridge for up to 4 days.
MARSHMALLOW
(adapted from Rasbperri Cupcakes)
INGREDIENTS
100ml water
3/4 cup Maple Syrup or Honey
2 Tablespoons Gelatin
100 ml water
1 egg white, at room temperature
1 Tablespoon Vanilla Extract
Arrowroot for sprinkling
INSTRUCTIONS
Place 100ml of water and Maple Syrup/Honey in a saucepan and bring to the boil over a medium heat.
At the same time sprinkle the gelatin over 100ml of water and allow to thicken.
Once the mixture is boiling reduce the heat slightly and add the thickened gelatin mixture, whisking vigorously to incorporated the gelatin and ensure no lumps remain.
Return to medium heat and return to the boil and boil for 1 minute, continuing to whisk.
Place the egg white in a clean bowl of a kitchen stand mixer with a whisk attachment.
Place mixture on medium and whisk until the egg white is frothy.
Pour the hot mixture in to the bowl, pouring slowly along the edge of the bowl.
Turn whisk to high and whisk for 5-7 minutes.
Add the Vanilla and whisk on high until firm but not set (another minute)
The mixture should be shiny and thick, but still able to be piped and spread.
Spread into a greased and lined dish or pipe out onto a greased and lined tray.
Allow to sit at room temperature overnight.
Once set sprinkle the arrowroot over Marshmallow pieces (this makes them less sticky and easier to handle). Alternatively, roll the pieces in arrowroot or you could even use dessicated coconut.
CHOCOLATE
Makes 200 grams of Chocolate.
Store left over chocolate in the freezer for future use.
INGREDIENTS
1/2 Cup Coconut Oil
1/2 Cup Cocoa
2 Tablespoons Maple Syrup
INSTRUCTIONS
Over a very low heat melt the coconut oil.
Add the maple syrup and stir.
Add the cocoa and stir until combined, ensuring no lumps.
Allow to cool slightly before using, or keep in freezer for future use.
I was an anxious partygoer growing up. When I was invited to a school friend’s party I was always worried if I had the right day, the right time. How uncool would it be arrive and be the only one there!
As I got older it was about what to wear, if my robot moves would cut it on the dance floor, boys and, oh yeah, boys. It was no 'arriving to school naked' dream and, of course, there was always a party bag to take home so that made it all ok.
4yo H started Kinder recently and this morning was supposed to be a meet and greet coffee session at a local Cafe for all the new mums. I have a tendency to not be very social in new circles (I think this comes from having a job where I talk to people all day and sometimes I need quiet time without my polite social face) so I decided to move out of my comfort zone, put on my sexy cowgirl outfit (sans hat) and go and 'meet and greet'. Here's how it went (and why party anxiety can extend to cafes).
8:50am - First one there. Decided to sit in the car with 2yo S and wait for someone else to arrive. Don't want to look like a loser sitting there by myself!
8:55am - a great big black van decided to park next to me and block my view of the cafe entrance. Have to leave the car to be able to see the entrance. My cover is blown!
9:00am - feeling like a bit of a knob sitting out the front so took 2yo S for a walk around the corner. Could spy a look in the cafe window... no one there yet!
9:05am - starting to feel like I must be a bit stinky, or perhaps I should have worn the cowgirl hat! Pretend to do something on phone to look less like a loser and more important.
9:10am - still no one else! The only new friend 2yo S and I made was a small rock he found under the park bench. We called him rocky… sadly he went missing at Aldi not long after.
New friends made: 0
Rocks lost: 1
So, the universal question: is it worse to get rejected by people who don't know you or by those who already dislike you?
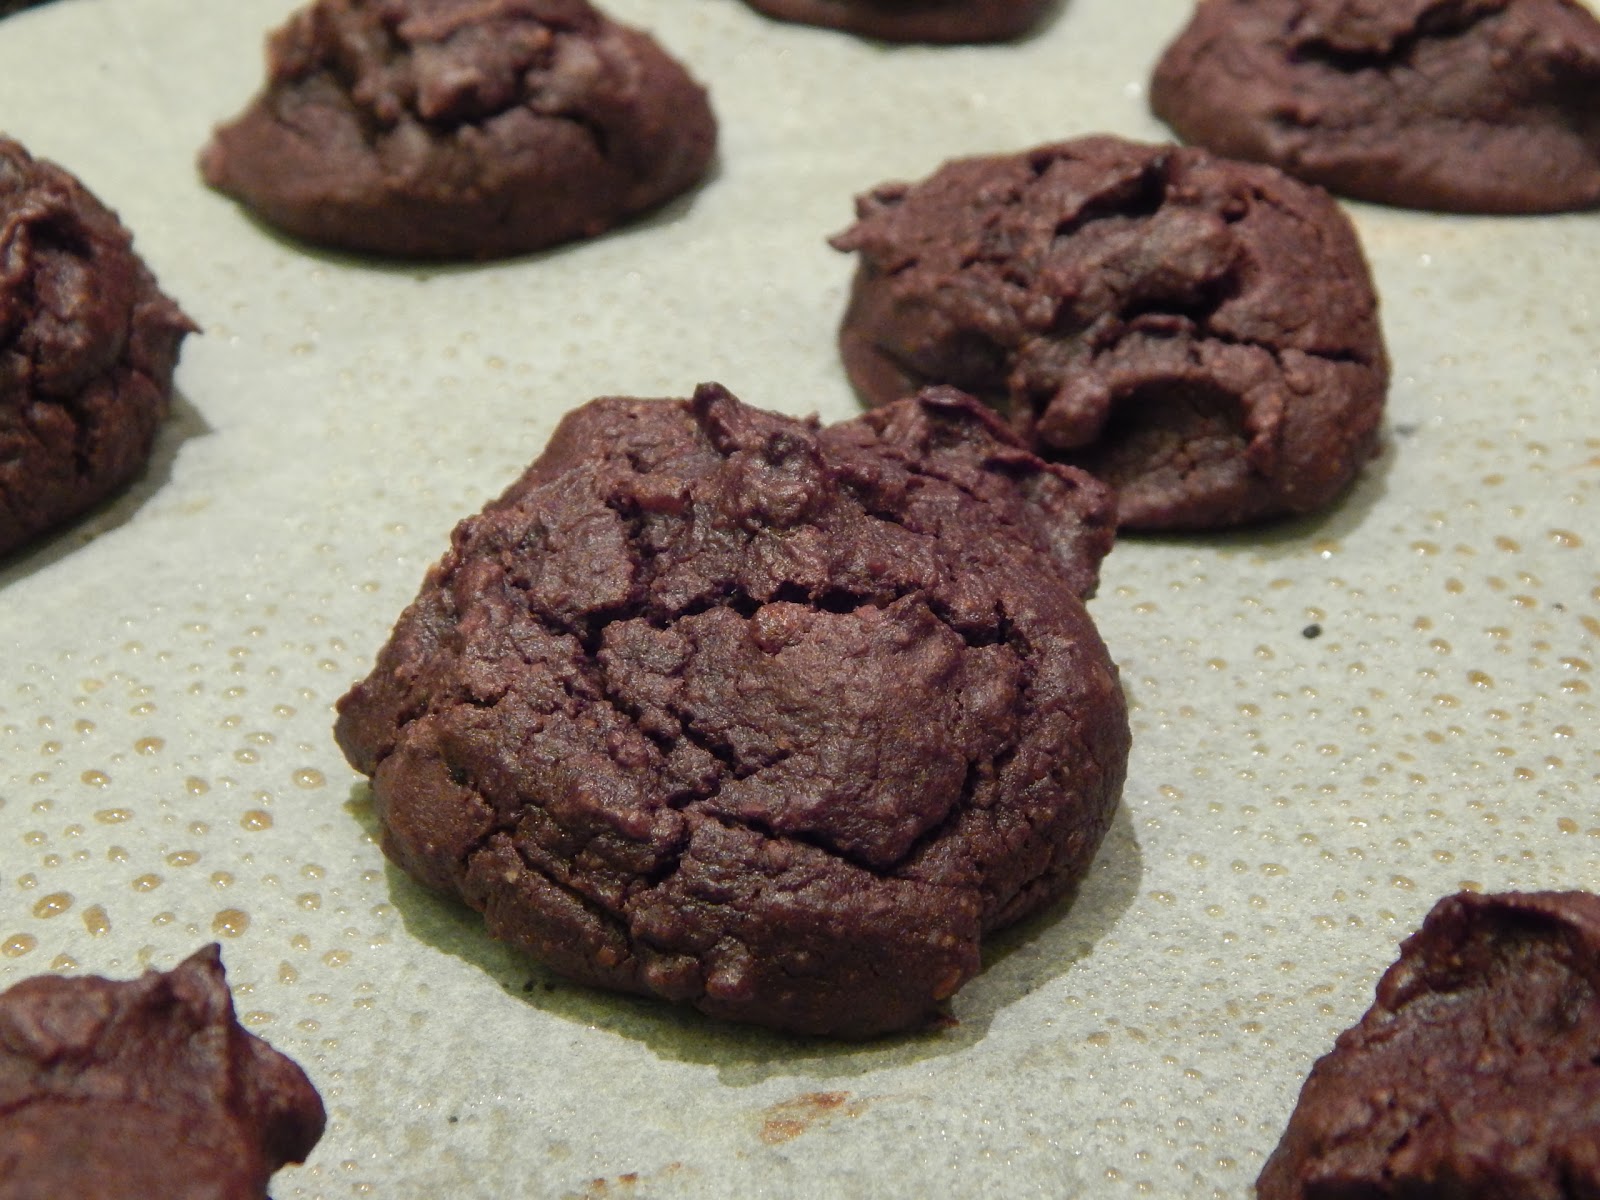
When you are stood up there is only 1 cure...Chocolate Cookies. Chewy, Chocolate cookies with a secret, fibre fueled ingredient; Chickpeas! These cookies are gluten, dairy and processed sugar free. They are low in fat and calories as they have no butter or sugar and, most important, they taste great! If you want to jazz up your cookies add some chocolate chips, nuts, dried fruits etc but they are pretty tasty even without it.
CHOCOLATE COOKIES... with a healthy secret!
INGREDIENTS
1/2 cup Dates
1/4 cup boiling water
Dash of Bicarb Soda
1/2 cup Chickpeas; canned, drained and then measured
2 Tablespoons Maple Syrup
2 teaspoons Vanilla Extract
2/3 cup Almond Meal
1/3 cup Arrowroot Flour
3 Tablespoons Cocoa
1 Egg
1/2 teaspoon Baking Powder
dash Salt
Optional extras: chocolate chips, nuts, coconut
INSTRUCTIONS
Preheat the oven to 175C/350F
Line and grease a large baking tray.
Place the dates in a small bowl and cover with the boiling water and the bicarb.
Allow to sit for at least 20 minutes.
Place the dates in a blender and purée.
Add the chickpeas, maple syrup and vanilla extract and blend until a smooth paste is formed.
Add the egg and blend in.
Add the dry ingredients to the blender and mix until combined.
A delicious cookie dough will form.
Using a dessert spoon, scoop spoonfuls of dough onto the tray.
The spoonfuls will form round balls on the baking tray.
Will make 12 biscuits.
DO NOT FLATTEN THE BALLS.
Place in the middle rack of the oven and bake for 16 minutes.
The cookies will be firm on the bottom and top, but still soft (not gooey) in the middle.
Remove from the oven and allow to cool on the trays.
Store in an airtight container for up to 3 days.
Valentines Day.
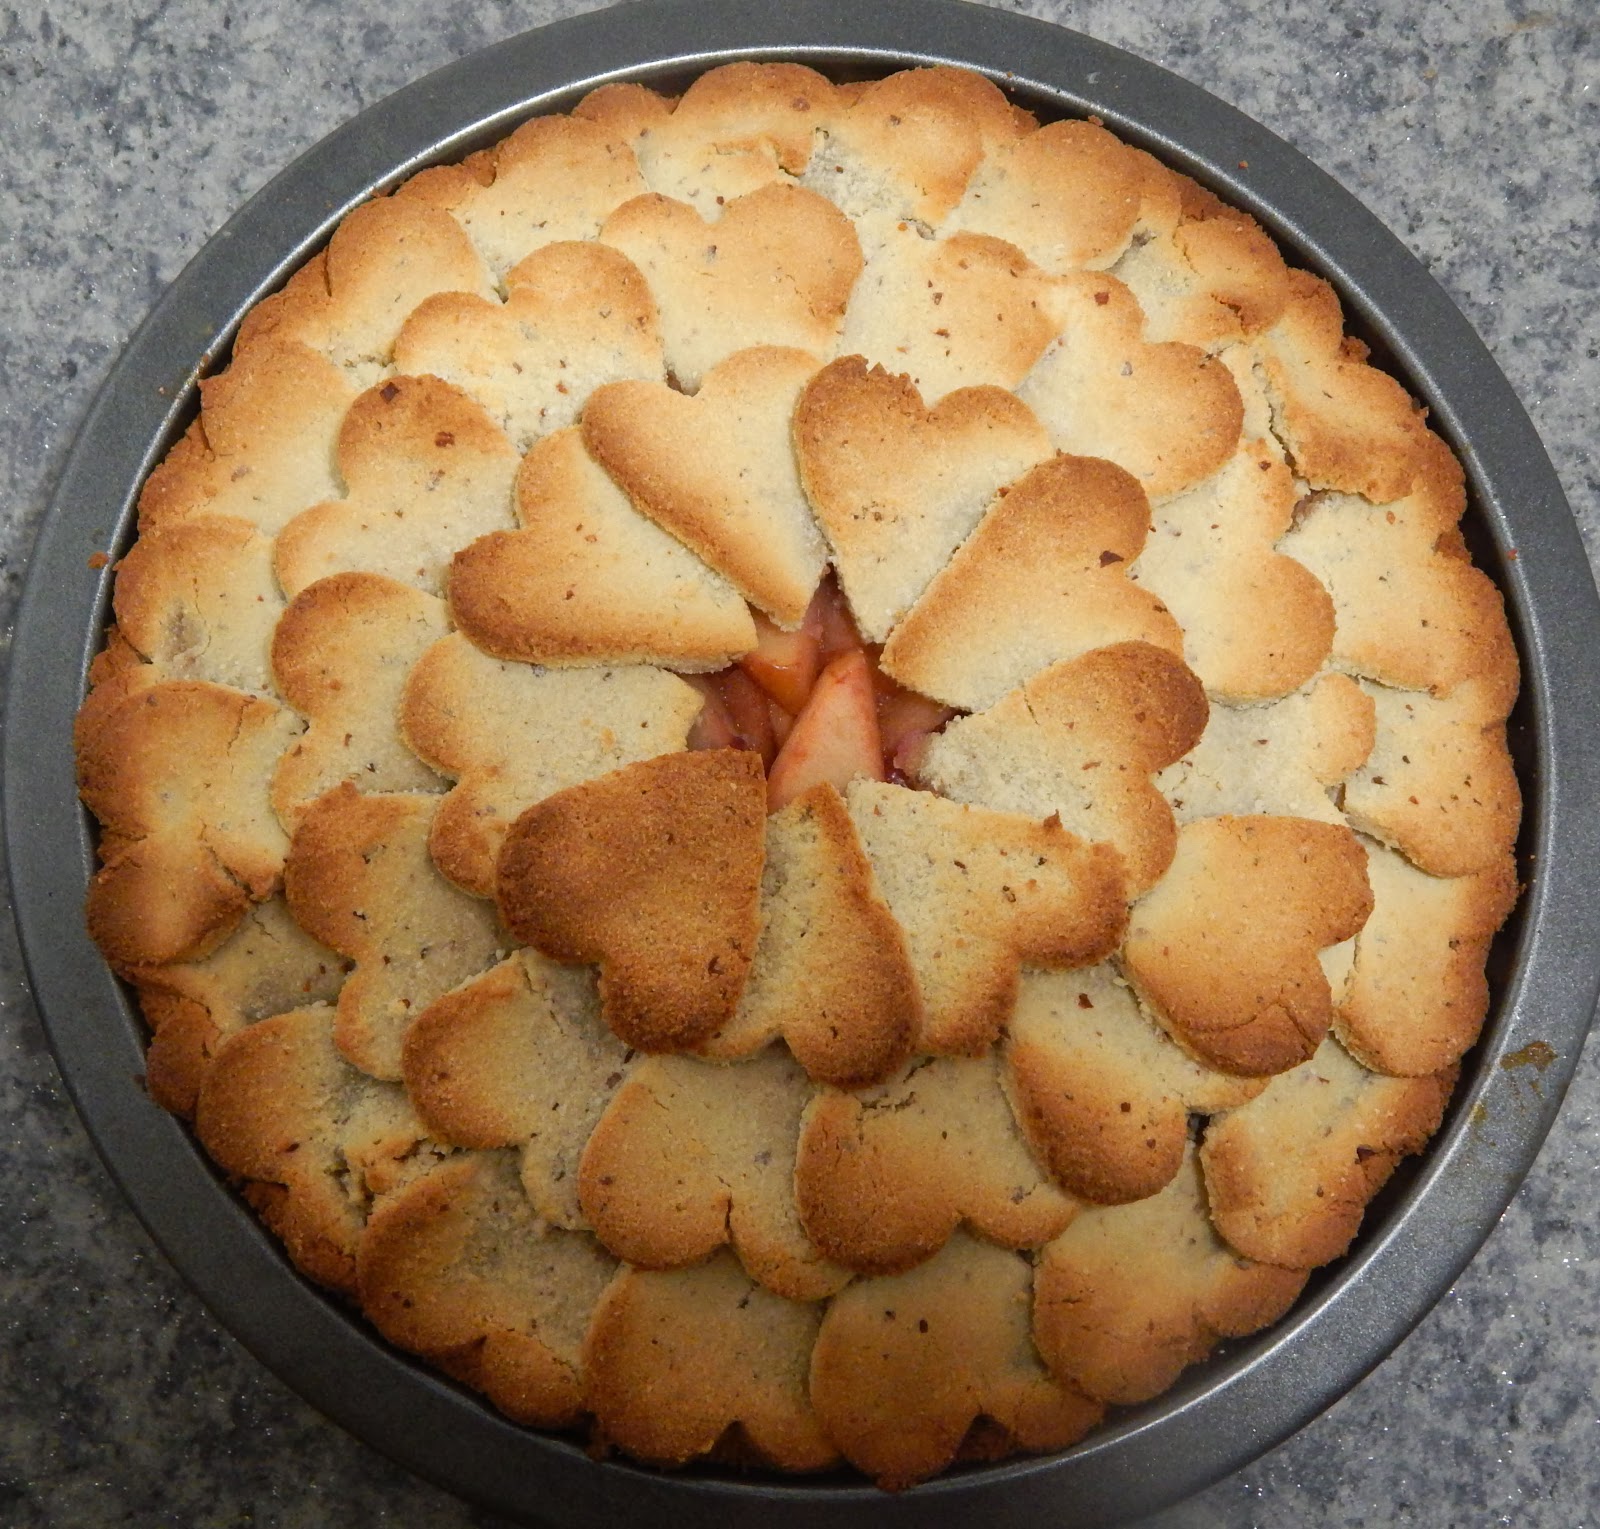
What's more romantic than a pie full of hearts? A stomach full of pie! And such a pretty pie it is.
Thanks to my new addiction to Pinterest I found this idea to turn a simple (yet tasty) pie into a romantic centerpiece, worthy of any loved up occasion. The construction of the pie is not difficult, it just takes some time to cut and place the hearts. I chose apple and strawberry as my flavors (for no other reason than that was all I had in the fridge!) however the strawberries could be substituted for raspberries or blueberries, and the apples for pears.
APPLE AND STRAWBERRY HEART PIE
(inspired by Martha Stewart)
Serves 12, Approximately 240 calories per slice
PIE CRUST
This is a double recipe.
Use 1/2 the recipe as the pie base and the other half as the heart toppers
Adapted from Against All Grain
INGREDIENTS
1/2 cup almond flour
1 cup plus 4 tablespoons coconut flour
1/2 teaspoon salt
1/2 teaspoon baking soda
1/2 cup coconut oil, softened
1/2 cup maple syrup (honey can be used)
2 eggs
2 teaspoon vanilla
INSTRUCTIONS
Pre-heat the oven to 175C/350F.
Grease the bottom of a 18cm/7inch pie tin.
Combine the dry ingredients in a kitchen blender and process on low until combined.
Add the wet ingredients and blend until the dough comes together.
Wrap the dough in plastic wrap.
Place the dough in the fridge for a minimum of 1 hour.
After 1 hour separate the dough into 2 equal parts. Wrap one ball of dough again and place in the fridge.
Press the remaining dough into the tin, pressing the dough up the edges of the tin to create a wall.
Pierce the bottom of the pastry 10 times.
Place in the oven for 7 minutes.
Allow the pie to cool.
Remove the 2nd ball of dough from the fridge.
Roll out the dough on a greased bench or on baking paper.
Using a 5cm H x 3cm W sized heart cutter, cut out 45 hearts (there may be a couple left over but it's safer to have more than less).
Place the hearts in the fridge until ready to use.
APPLE AND STRAWBERRY FILLING
INGREDIENTS
500 grams of Apple (measured before cutting), peeled, cored and diced
1/4 cup water
2 Tablespoons Maple Syrup (or Honey)
Zest of 1/2 lemon
300 grams Strawberries, hulled and cut into large segments (frozen or fresh is fine)
INSTRUCTIONS
Per heat the oven to 175C/350F
Place the apple, water, maple syrup and zest in a saucepan.
Simmer, with lid on, for 10-12 minutes, or until the apple is soft.
Stir in strawberries and allow to cool.
Once cooled, drain the excess liquid from the fruit mixture.
Spoon the drained mixture into the cooled pie crust.
Brush water over the edge of the pie crust.
Arrange the cut hearts around the edge of the pie, gently pushing the hearts into the pie crust to join.
Once the outside circle is complete move to the middle circle and place hearts concentrically around, joining and overlapping as per the first layer.
Complete the inner circle last.
Brush the hearts lightly with water and lightly press the overlaps together.
Place the pie in the oven for 20-25, or until the hearts start to brown (but not burn).
Allow to cool for 10 minutes before serving or wait and serve cold.
Serve with Whipped Coconut Cream.
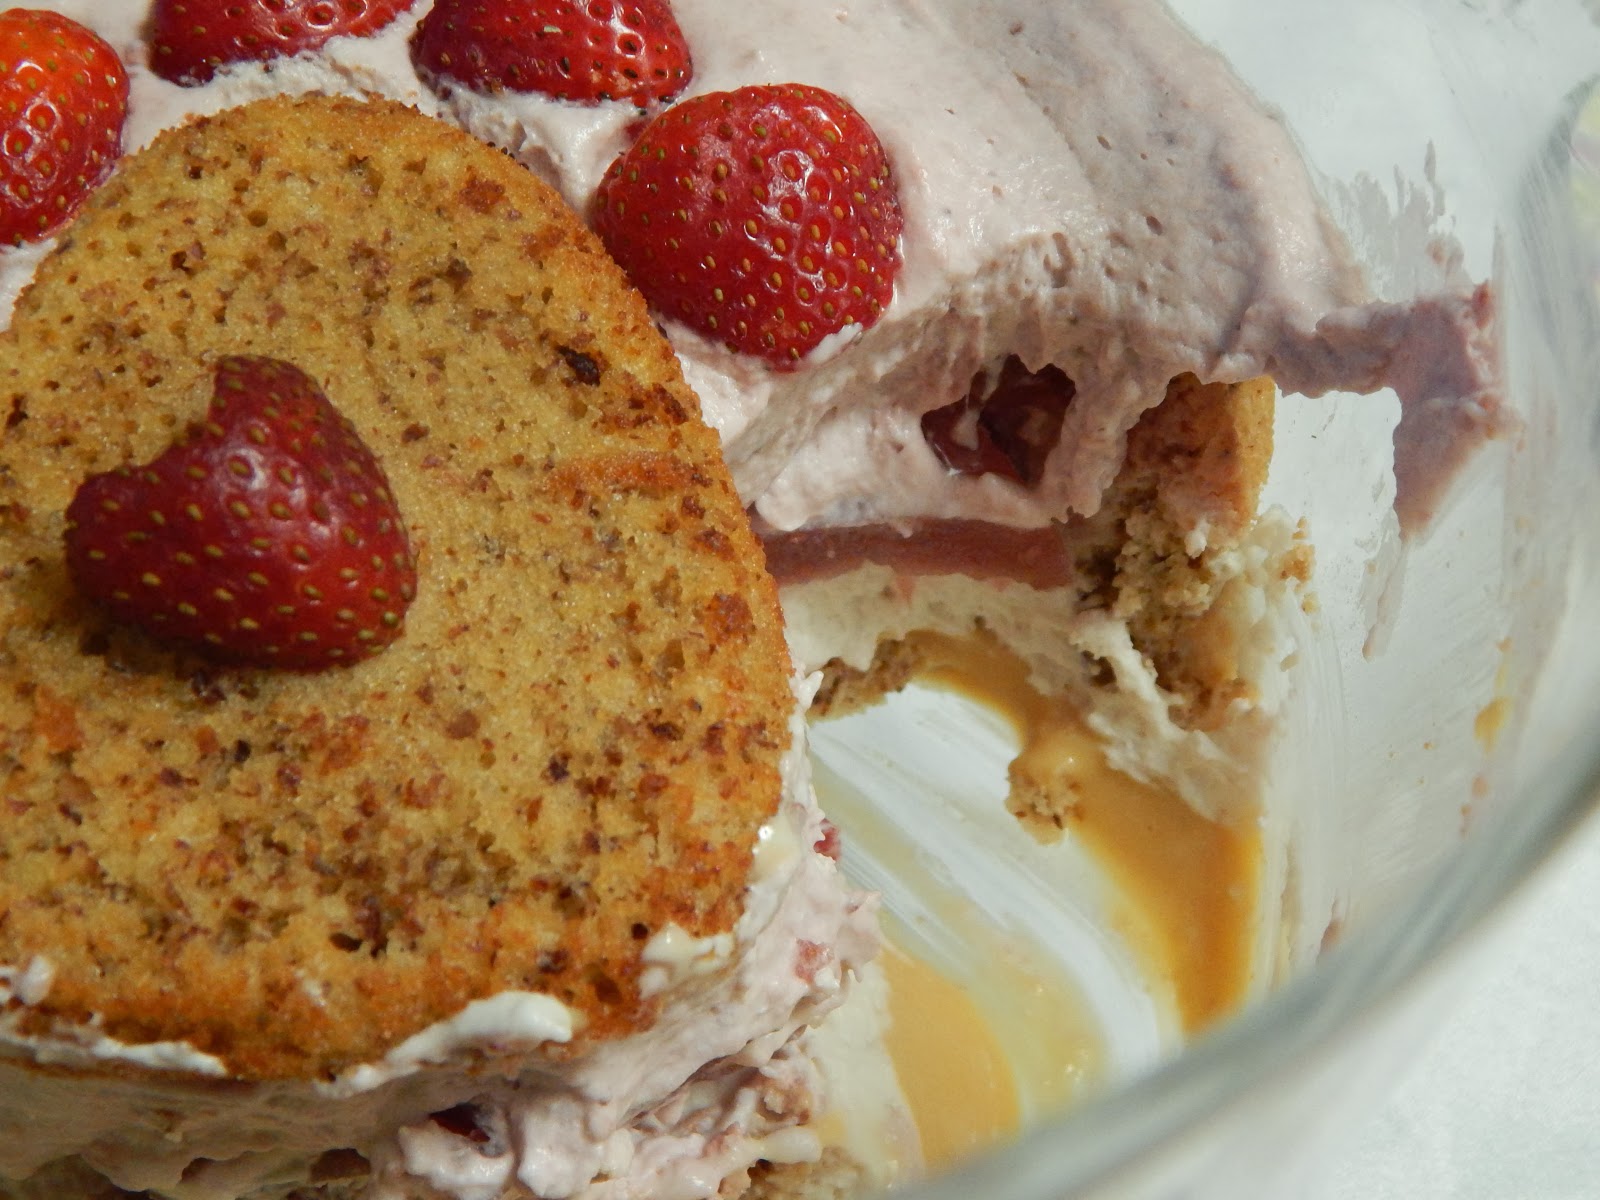
I wanted to make a romantic dessert as today is our 7 year wedding anniversary. It's also Valentines Day this week so it's a whole week of ooey, gooey romance; or not as this trifle proved.
The old saying that the best way to a mans heart is through his stomach is tried and true. That's what I decided to do for our wedding anniversary (and it wasn't just because I couldn't think of a decent present for him and he got me an amazing new Camera); A lovely family dinner of Roast Pork with crunchy crackling, 3 veg mash, caramelized onion gravy and my husbands favorite nostalgic food; Yorkshire Puddings, and, of course, dessert.
Now dessert is where it all went wrong. Romantically wrong that is, definitely not dessert wrong! Layers of cream and strawberries with tasty donuts and custard; it even sounds romantic! How'd it taste? AMAZING! So amazing that I consumed a days worth of calories in 1 sitting, I couldn't move from my chair and, in a very romantic move, I had to undo my fly to allow my belly to bloat! I finally rolled over to the couch and haven't been ale to move since! Sexy huh?!!
This trifle was inspired by Sprinkles Bakes and eaten mostly by me.
This trifle includes one of my favorite creams, Strawberry whipped cream. We often make it to eat straight from the bowl.
Don't like strawberries? Replace the strawberries in all elements with cherries, raspberries, or blueberries etc. Personally, I think strawberries are very romantic!
DONUT AND STRAWBERRY VALENTINES TRIFLE
(inspired by Sprinkle Bakes)
Serves lots - or just me!
Make all the individual parts and assemble the trifle at least 12 (but preferably 24) hours before serving.
DONUTS
From Primal Palate
Makes 12 small donuts and 2 large hearts.
The number will depend on the size of your tin.
Ensure that there are enough donuts to make a ring around the trifle bowl; the rest will be crumbed so can be any shape
INGREDIENTS
1 1/2 cup Blanched Almond Flour
1/2 cup Arrowroot Flour
3 tsp Baking Powder
1/2 tsp Salt
2 Eggs
1/2 cup Maple Syrup
1 tsp Pure Vanilla Extract
3/4 cup Milk of Choice
3 Tbsp Coconut Oil, melted
INSTRUCTIONS
Preheat the oven to 175C/375F degrees.
In a kitchen blender, combine the almond flour, arrowroot flour, baking powder, and salt.
Pulse til combined (if you don't have a blender use a bowl and stir)
In a small bowl, whisk the eggs, maple syrup, vanilla extract and milk until combined.
Pour the wet ingredients into the dry, and pulse all ingredients in a kitchen blender (or use a hand mixer) until smooth.
Add your softened coconut oil to the mixture and blend again until combined and smooth.
Grease the donut pan (depending on the size of your tin you may need to do 2 batches).
Smooth the tops of the batter and bake the donuts for 12 minutes, making sure to check then after 10 minutes.
Remove donuts from oven, and allow to cool in the tin.
Grease donut pan again, and repeat for another batch of donuts (if required)
CUSTARD
Adapted from Adriano Zumbo
INGREDIENTS
4 egg yolks (approximately 70 grams)
300ml Milk of choice
1 teaspoon vanilla extract
1/4 Cup Maple Syrup
2 1/2 Tablespoons Arrowroot Flour
INSTRUCTIONS
Place the milk and vanilla in a saucepan.
Bring the mixture to near boiling point over low/medium heat.
Place the egg yolks, maple syrup and arrowroot in the bowl of a kitchen stand mixture (or using an electric hand whisk) and whisk on medium until pale and thick. This may take 3-5 minutes.
With the whisk still on, gently pour the almost boiling milk mixture into the bowl. Do this by pouring the hot liquid down the sides of the bowl.
Return to combined mixture to the saucepan and whisk continually over medium heat until boiling. Continue whisking the boiling mixture for 1 minute.
Pour the custard into a heat proof bowl and allow to cool.
Cover with plastic wrap and Refrigerate until ready to use.
Before using, whisk the custard so that it is easy to pour.
STRAWBERRY JELLY
INGREDIENTS
250 grams frozen Strawberries, thawed (fresh can also be used)
240 ml boiling water
1 Tablespoon Gelatin
INSTRUCTIONS
Place the thawed (or fresh) strawberries in a blender and puree.
Sprinkle the gelatin over the boiling water and whisk til dissolved.
Stir the purée into the gelatin water and whisk til combined.
Line a tray with plastic wrap and pour in the jelly mixture (using plastic wrap makes the jelly easier to remove).
Place the tray in the fridge and allow to set for at least 4 hours.
Remove the jelly from the tray using the plastic wrap and cut into small cubes when ready to use.
STRAWBERRY WHIPPED CREAM
INGREDIENTS
200 grams strawberries (frozen or fresh)
1 Tablespoon Maple Syrup
1 Tablespoon Water
1 Can Coconut Cream, lid removed and Placed in the fridge over night
2 teaspoons maple syrup
2 teaspoons vanilla extract
INSTRUCTIONS
Place the strawberries, maple syrup and water in a small saucepan and bring to the boil.
Simmer, stirring occasionally, for 10 min; or until thickened (it will have the consistency of jam).
Allow the strawberry mixture to cool.
Into the bowl of a kitchen stand mixer, scoop the thicken cream from the can discarding the watery remains.
Add the maple syrup and vanilla and whisk on high until thick (allow 5-8 minutes).
Add the strawberry mixture and whisk on medium/high until combined.
Place the Strawberry Cream in the fridge to thicken before using,
WHIPPED COCONUT CREAM
INGREDIENTS
1 Can Coconut Cream, lid removed and Placed in the fridge over night
2 teaspoons maple syrup
2 teaspoons vanilla extract
INSTRUCTIONS
Into the bowl of a kitchen stand mixer, scoop the thicken cream from the can discarding the watery remains.
Add the maple syrup and vanilla and whisk on high until thick (allow 5-8 minutes).
Place the cream in the fridge to thicken before using.
CONSTRUCTION
INGREDIENTS
1 punnet of Strawberries
INSTRUCTIONS
Using a medium/large trifle dish, arrange donuts around the sides of the bowl.
Divide the remaining donuts into 2 piles; crumb 1 pile over the bottom of the trifle dish.
Pour the custard over the crumbed donuts, spreading it to the edges of the bowl.
Spoon the Whipped coconut cream over the custard, spreading the cream to the edges.
Cut the tops off and halve enough strawberries to place 1 half between each donut.
The strawberry will be placed at the point when the donut edges meet.
Crumb the remaining donuts and sprinkle over the Whipped coconut cream.
Hull and dice 4-5 strawberries and sprinkle over the cream and donut crumbs.
Evenly spread the diced jelly pieces over the top of the cream/crumbs/strawberries.
The jelly may require 2 layers.
Evenly spread the Strawberry Whipped Cream over the jelly.
Decorate the top of the trifle using strawberries and (if you have an left) a donut or donut heart.
Place the trifle in the fridge to set for at least 12 hours, but preferably 24 hours. This allows the flavors to maximize.
This week my little big boy, H, started Kindergarten.
I know he is ready; his excited, enthusiastic and has been driving me up the wall these holidays, but that doesn’t stop me feeling like someone has ripped out a piece of my heart.
For the past 4 and bit years I have been his primary source of care, knowledge and love. My days have been consumed by caring for, playing with and nurturing H and 2 year old S. Now some of that has been taken away from me; and I feel like I have lost a part of myself. I have cried myself to sleep, eaten a lot of Chocolate Mousse with Whipped Coconut Cream and even wore my sexiest skirt to cheer myself up today; but still I miss my little boy, even though he’s sleeping in the next room.
It’s the beginning of the ends; the end of free time playing at home, of lunch time chats about his imaginary friends Anker and Ridgey Didge (I’m not lying; he made up those names!), of watching S following H around the house mimicking his every move and sound, and of incessant questions about life (although I’m sure he’ll store them up for when he gets home!). It’s the end to the time of his life when he thinks that I am the “most best mummy ever”, and when my relevance starts to change in his ever growing world.
I know it’s also the beginning; of new friends, of wild adventures and excursions, of growing character and independence, and of new memories. It’s the start of his next journey when he grows into a clever and cheeky, imaginative little man.
I will miss him dearly.
It’s also the beginning of a new period for 2 year old S and I. We have been a threesome in our daily outings and home life since he was born and now it will be just he and I. If his latest escapades are anything to go by the next 2 years before he leaves me for Kindergarten may be handful; but they will also be a wonderful opportunity to explore his love of music, his sudden interest in drawing on the carpet and to nurture his personality away from his big brother.
Even though I feel like less of a mother because H is growing up and moving on deep down I know (hope) that he (and S) will always need me. Whilst it may no longer be to change their nappies or feed them their lunches, it will be in the form of unconditional love and support; not to mention the taxi service to different school and sporting activities, play dates and parties.
Regardless of whether you are with your child for 24 hours or 1 hour a day; you are still, and will always be, their mother. And no one loves their child like a mother does.
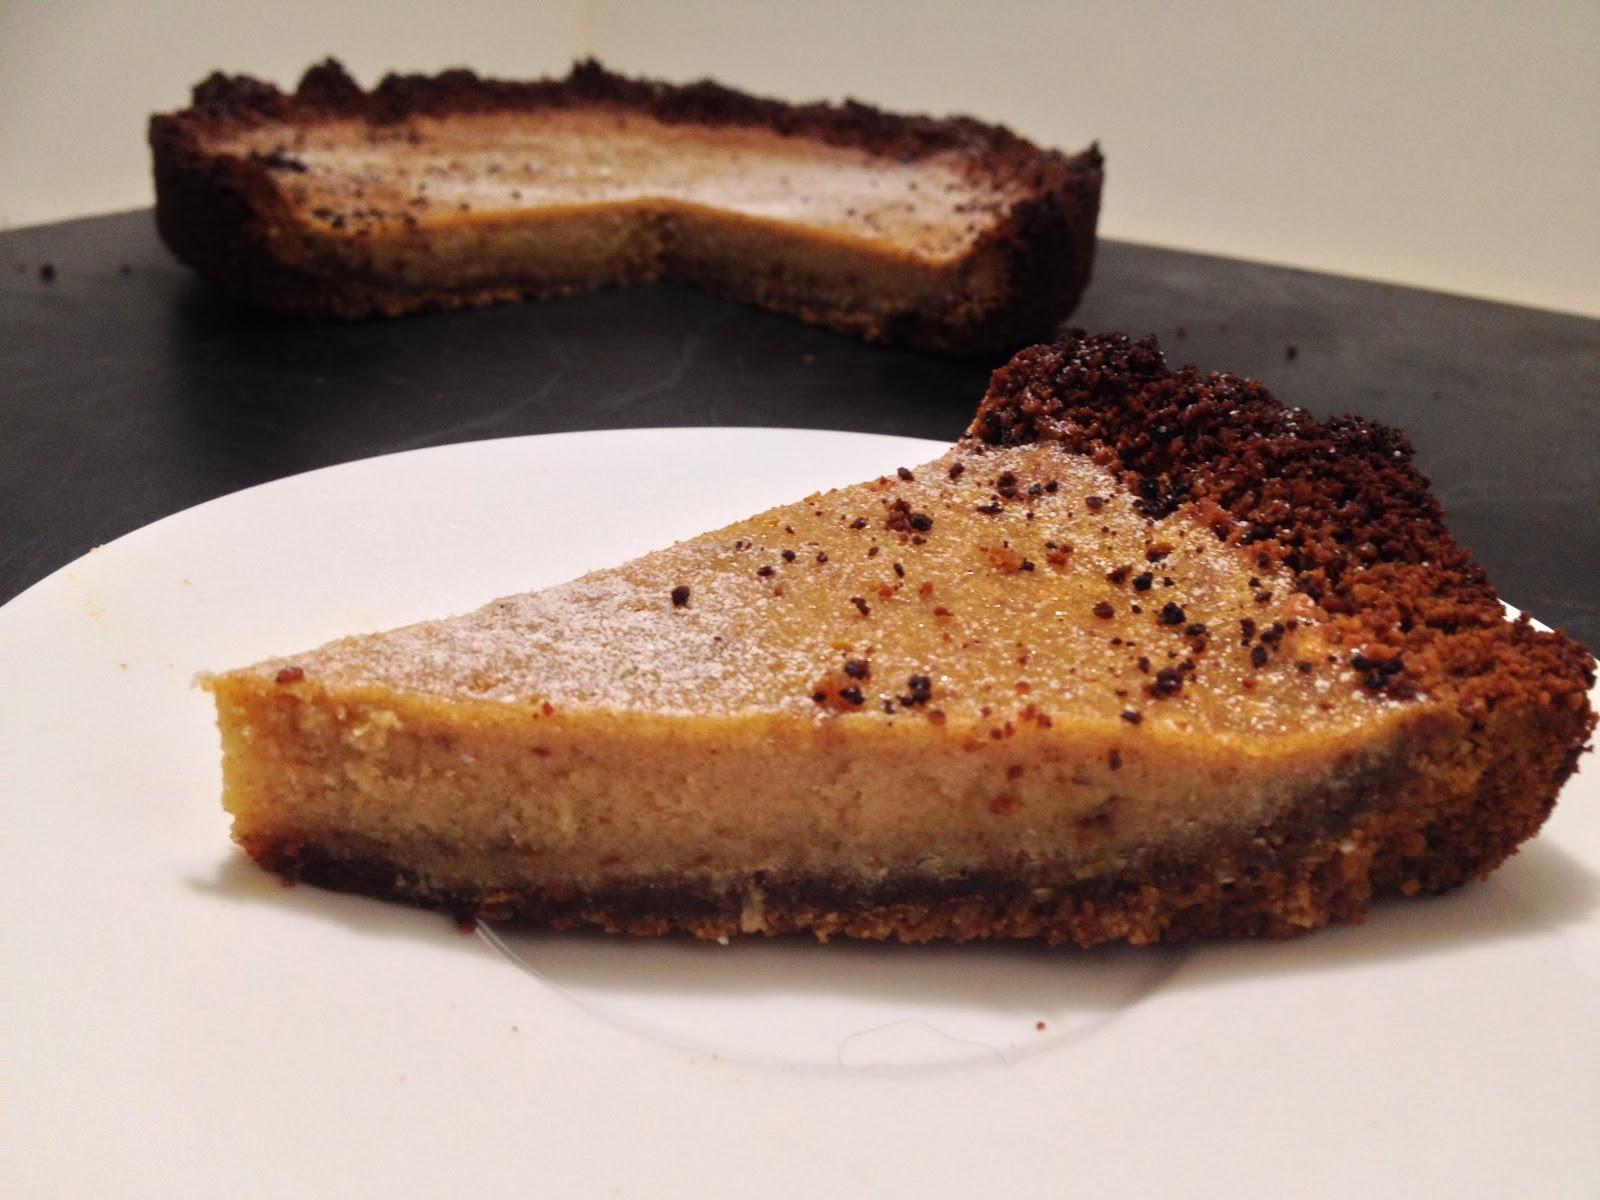
This Pie probably would have helped me out this week. Mumofukos Crack Pie is infamous; however I’ve never tried it. There’s the distance factor (NYC to regional Australia is a bit far for pie) as well as the gluten/sugar issues. This version, however, is one that can mend a dietary restricted broken heart. As I haven’t tasted the original I cannot vouch for its authenticity, however I can vouch for its awesomeness. So can my husband, who ate a considerable about of Crack pie.
Word of warning; following the recipe closely. Especially for the pie filling and cooking the pie. Ensure it is frozen for the recommended time period and serve cold. Don’t even let it sit on the bench for 10 minutes before eating; it changes the texture. Eat it straight out of the fridge; quite literally stand at the door with a spoon in the pie dish and eat it. It’s THAT GOOD!
CRACK PIE (Gluten, Dairy, Processed Sugar Free)
(Inspired and adapted from Momofuko)
Makes 16 pieces of pie
BUTTERNUT SNAP PIE CRUST
Makes 1 base for a 20cm/8inch tin
INGREDIENTS
2 tablespoons coconut oil
1/2 cup Maple Syrup
1 egg
1/2 teaspoon vanilla extract
2 tablespoons golden syrup
Pinch of salt
1/2 teaspoon cream of tartar
1 teaspoon bicarb soda
1 1/2 cups Almond Meal
1 cup desiccated, unsweetened coconut
3 tablespoons arrowroot (tapioca) flour
1 tablespoon milk (Coconut, almond etc)
1/4 cup melted Coconut Oil
INSTRUCTIONS
Preheat oven to 175C/350F.
Line and grease a large baking tray.
Combine all the wet ingredients (except the milk) in a blender and mix until combined.
Add the dry ingredients and blend until combined. Add the milk and pulse in.
Spread the cookie dough evenly in the tray.
Bake in oven for 15 minutes
Take the tray out of the oven and break up the biscuits using a fork (it will be more cakey than biscuity at this stage).
Place the tray back in the oven for 5 minutes, or until the biscuit mixture is cooked through.
Cool on the tray.
When biscuits have cooled place them in a blender.
Process them until the biscuits are just broken. You will only need ¾ of the crumbs for this crust, so put the rest aside (and eat them !)
Add the coconut oil and process again until fine crumbs are formed and the oil has ‘binded’ the biscuits.
Press crumbs into a lined and greased 20cm/8inch spring form cake tin (a pie dish can also be used).
The biscuit base will need to extend up the walls of the tin but only for a small height.
Use base immediately or refrigerate if not using til later.(the base will need to be at room temperature when filled)
CRACK PIE FILLING
INGREDIENTS
½ cup Maple Syrup
1/3 cup + 1 Tablespoon Dates
40ml boiling water
4 teaspoons Coconut Milk Powder
4 teaspoons Arrowroot
Dash Salt
3 Tablespoons Coconut Oil, melted
1/3 + 1 Tablespoon Coconut Cream (the thick cream spooned form an opened can of Coconut Cream left in the fridge overnight)
1 teaspoon vanilla extract
4 Egg Yolks
INSTRUCTIONS
Place the dates in a small bowl and cover with the boiling water.
Allow to sit and soften for at least 20 minutes.
Add the dates and maple syrup to a blender and process until pureed.
In a separate bowl sift the coconut milk, arrowroot and salt.
Transfer the pureed mixture to the bowl of a kitchen stand mixer with a paddle attachment. Add the sifted dry ingredients and mix on low speed until evenly blended.
Add the melted coconut oil and beat on low for 2 to 3 minutes until all the dry ingredients are moist.
Add the Coconut Cream and vanilla extract and continue mixing on low for 2 to 3 minutes until any white streaks from the cream have completely disap¬peared into the mixture. Scrape down the sides of the bowl with a spatula.
Add the egg yolks, paddling them into the mixture on low until just combined; be careful not to aerate the mixture, but be certain the mixture is glossy and well blended. Mix on low speed until it is.
Use the filling immediately or if not using the filling straight away store it in an airtight container in the fridge.
CONSTRUCTION
(This is the exact process used by Momofukos- no need to mess with perfection!)
Preheat the oven to 175C/350°f. (it should already be at this temperature if making all the elements at the onetime)
Pour the Crack Pie Filling into the Butternut Snap Pie Crust; the filling should fill 3/4 of the way up the side of the crust.
Bake for 15 minutes only. The pies should be golden brown on top but will still be very jiggly.
Open the oven door and reduce the oven temperature to 160C/325°f.
Depending on your oven, it may take 5 minutes or longer for the oven to cool to the new temperature. keep the pies in the oven during this process. When the oven reaches 165C/325°f, close the door and bake the pies for 5 minutes longer. The pies should still be jiggly in center but not around the outer edges. If the filling is still too jiggly, leave the pies in the oven for an additional 5 minutes or so (check after 3 minutes then recheck at 5 minutes)
Take the Pie out of the oven and transfer to a rack to cool to room temperature.
Once cooled, freeze your pies for at least 3 hours, or overnight, to condense the filling for a dense final product. THIS IS ESSENTIAL!
If not serving the pies right away, cover in plastic wrap and keep in the fridge,
Transfer the pie from the freezer to the refrigerator to defrost a minimum of1 hour before serving.
The pies need to be served from the fridge NOT at room temperature.
Serve the Crack Pie cold. Sift Coconut flour over the top for decoration.
This is quite a sweet, dense pie. Serve with Whipped Coconut Cream if required.

The Queen of Hearts (that's me)
She made some tarts,
All on a summer's day; (in the middle of a heat wave)
The Knave of Hearts
He stole those tarts,
And took them clean away. (i.e. my Husband ate them all! Well... not all of them. Tarts are a well-rounded breakfast meal)
The King of Hearts
Called for the tarts,
And beat the knave full sore; (they did taste pretty good)
The Knave of Hearts
Brought back the tarts,
And vowed he'd steal no more. (well, until he caught a whiff of the next batch that is!)
I have a confession.
I had known about, tasted, eaten copious amounts of and LOVED Chocolate Cream for a while now and haven't shared my recipe with you.
It's not that I was trying to keep it all for myself and that I somehow thought that by sharing the recipe with you it would result in less cream for me. That's crazy...
It's not that I had convinced myself that this Chocolate cream was the secret ingredient to making everything taste better... although it would.
It was my little secret... my sweet, chocolate, fluffy secret.
This Chocolate cream goes thick once its been whipped and stored in the fridge. It has the same consistency as store bought mousse, only without extra nasty ingredients.
My suggestion would be to make 2 serves on the Chocolate cream... it's that damn good!

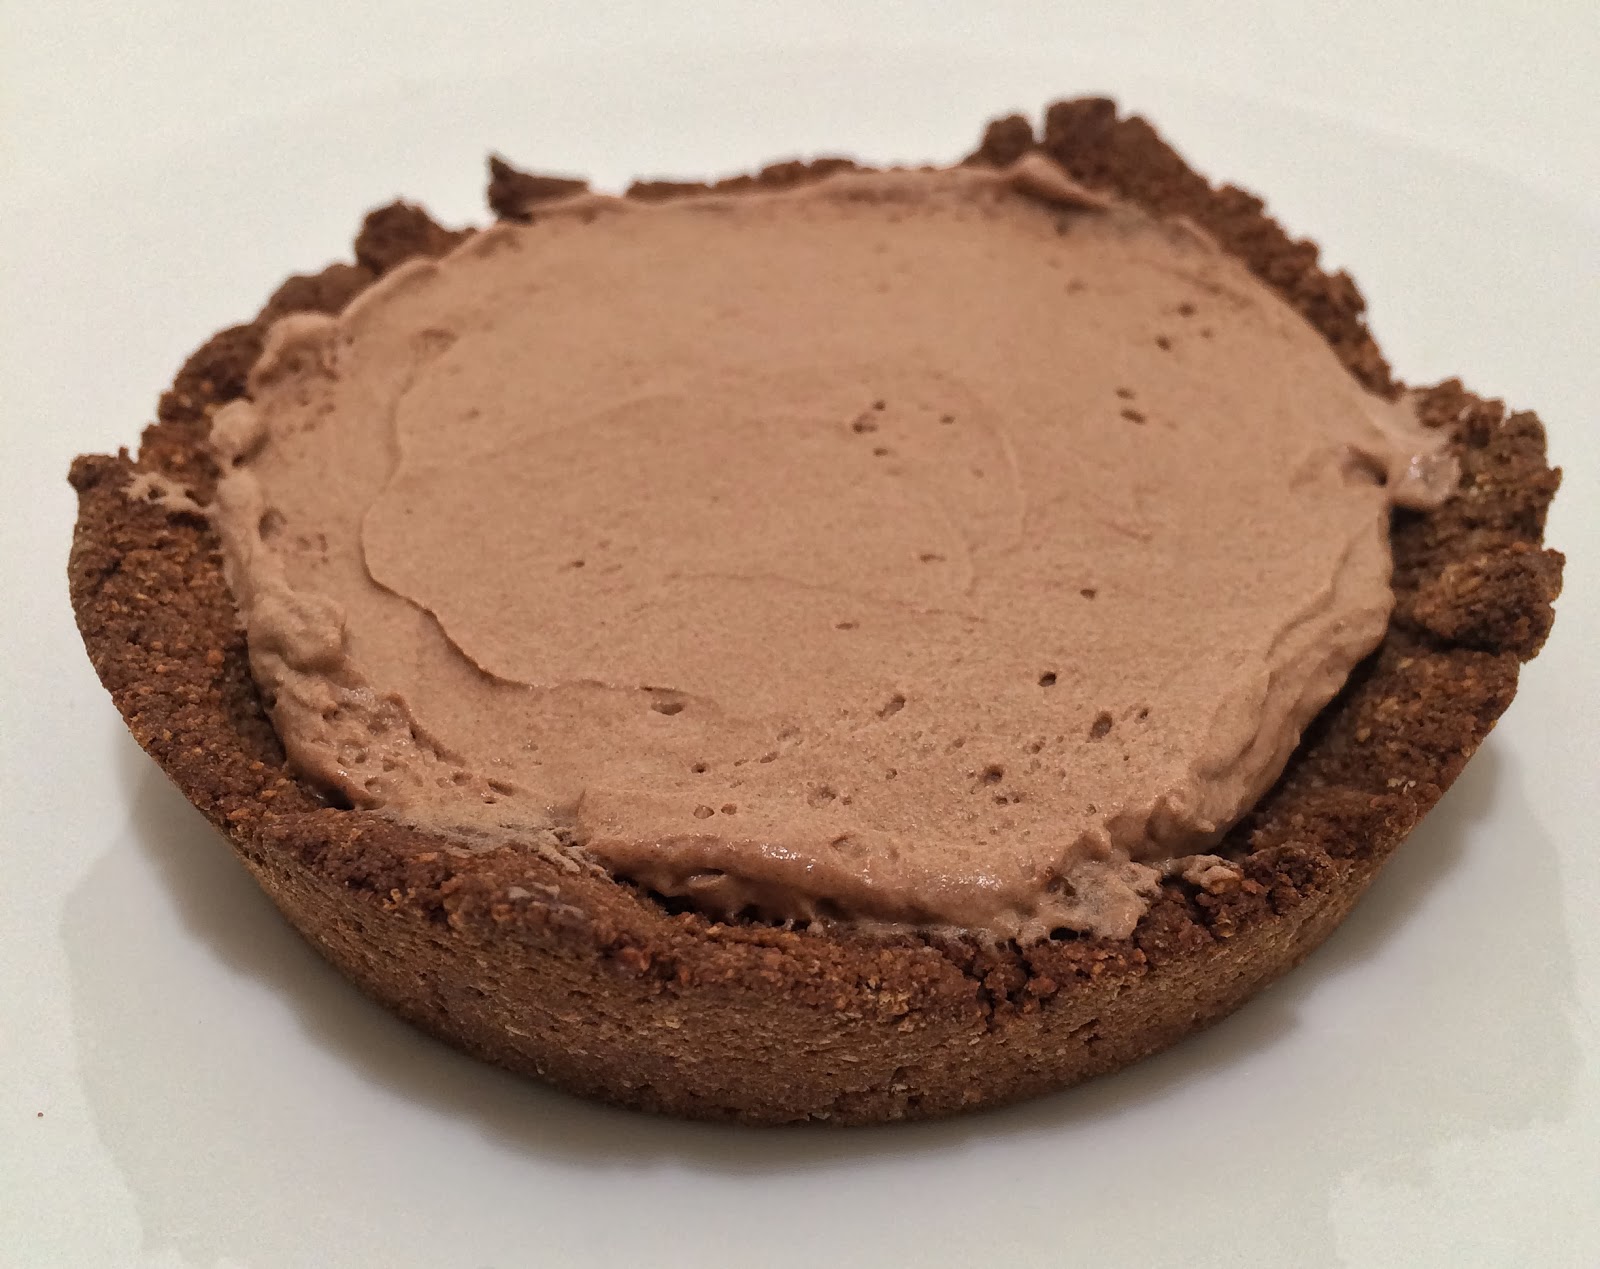
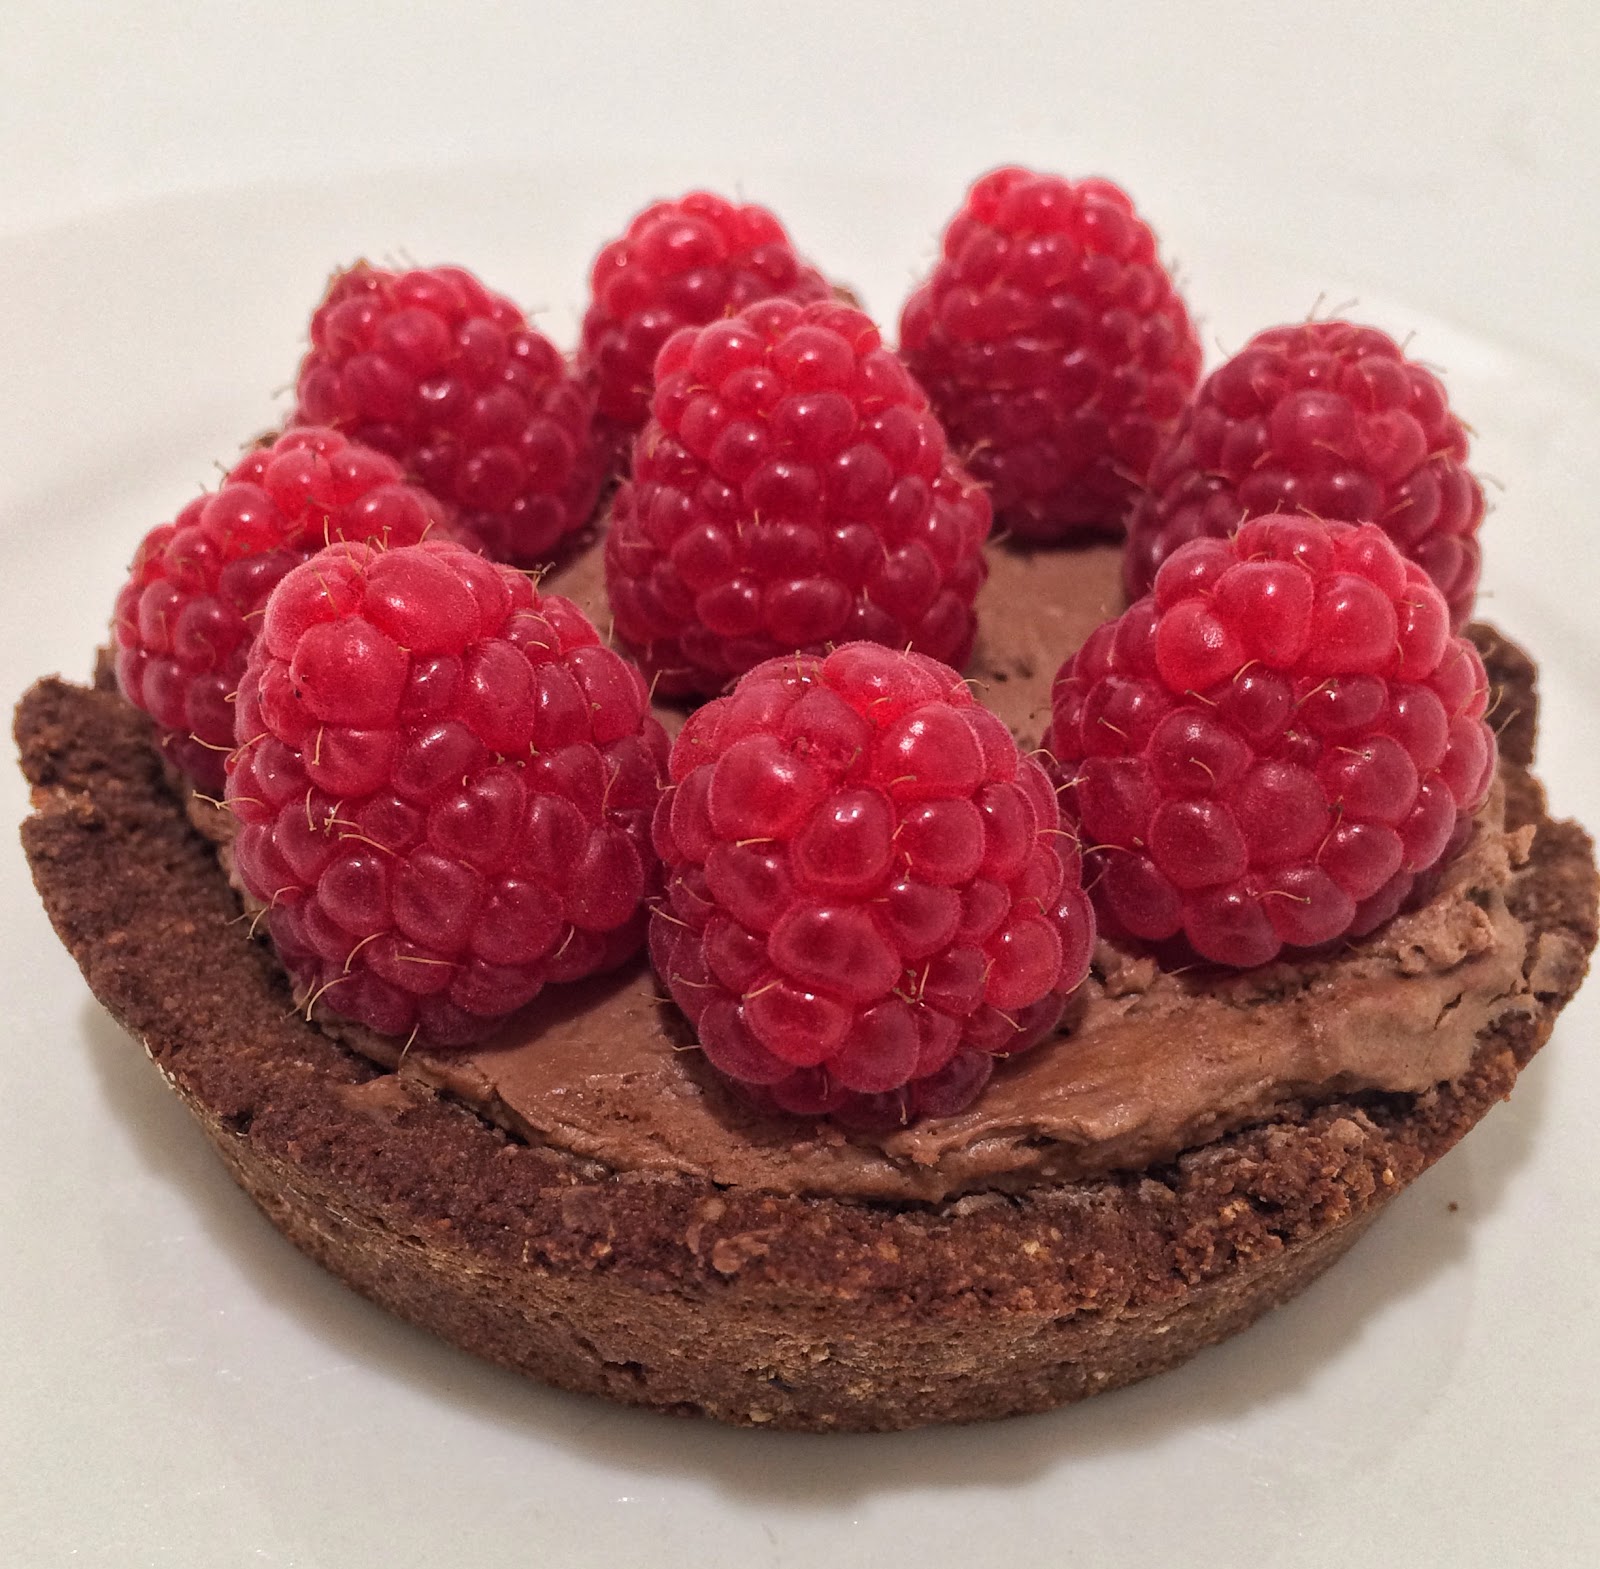
RASPBERRY CHOCOLATE CREAM TART
Makes 6 small tarts or 1 large Tart (using a 8 or 9 inch tin)
INGREDIENTS
1/4 cup almond meal (or another nut meal of your choosing)
1/2 cup coconut flour (available from health food and specialty stores)
2 tablespoons unsweetened cocoa
1/4 teaspoon salt
1/4 teaspoon baking soda
1/4 cup coconut oil, softened
1/4 cup maple syrup (you could substitute honey etc)
1 egg
1 teaspoon vanilla
1 serve Chocolate Coconut Cream
1 punnet Raspberries
Extra Cocoa for dusting
INSTRUCTIONS
Preheat the oven to 175C (350F).
Grease/Spray 6 small tart tins, or what ever size you choose (this recipe could be done as a normal size tart).
Mix the dry ingredients in a blender.
In a separate small bowl, whisk together the wet ingredients.
Pour the wet ingredients into the dry, and blend until combined.
Form a ball with the mixture, wrap it in plastic and place in the fridge for 20 minutes.
Divide the mixture into 6 even balls.
Press each ball into a greased mini tart tin; covering the bottom and up the sides of the tin.Trim the edges of the tart to make a nice clean edge.
Pierce the crust several times with a sharp knife.
Bake for 13-15 minutes.
Remove from the oven and allow to cool completely.
Whilst cooling, whip the Chocolate Cream (recipe below).
When tart crust has cooled spoon the cream evenly into the tarts.
Place raspberrys on top of the tarts.
Sift Cocoa over each Taft.
Serve immediately or store in the fridge.
CHOCOLATE CREAM
INGREDIENTS
1 can Coconut Cream, can opened and left in the fridge overnight
2 Tablespoons Cocoa
1 1/2 Tablespoons Maple Syrup
2 teaspoons Vanilla Extract
INSTRUCTIONS
Remove the can of coconut cream from the fridge and spoon out the thickened cream from the top of the can into a kitchen stand mixer bowl fitted with a whisk attachment (or use a hand blender).
Discard the watery remains from the can.
Add the maple syrup and vanilla extract and whip until thick (allow between 5-10 minutes).
Shift the cocoa over the cream and whip until incorporated.
Place the cream in the fridge for 1 hour to thicken