
I overheard a conversation between 2 young men the other day. One asked the other if he'd "tried talking to her telepathically". He replied that he "couldn't get close enough to use his powers".
This conjured up some weird images for me of these 2 young men (they were in their early 20's) at a bar trying to edge their way close enough to a pretty girl so they could use their telepathy to send pick up lines (It really gives a new meaning to the come on "are you made of dynamite cause you just blew my mind"!). It sounded really creepy; how does the pretty girl turn down her would be suitor if she can't throw a drink in his face?
Turns out they weren't trying to infiltrate the minds of poor unsuspecting women. They were talking about a video game and they were not young men, but a Wizard and a Hunter. I had not immediately thought they were gaming nerds as we were in the gym at the time and they were sporty looking types, as opposed to the runty, nerds I assume are the only ones to be gamers.
Looks I made some sweeping generalisations about stereotypes and got it wrong (although how interesting would it make a Saturday night if telepathy was a pick up technique...as opposed to sleaze!).
Generalisations and stereotypes exist in the food world too, especially when it comes to healthy and alternative foods. People assume that you are weird for making healthier food choices, when in fact it is they who are truly mad for knowingly eating food that will make them less healthy! At a restaurant the waiters will roll their eyes at you as you probe them to find out every small detail about the ingredients and at the supermarket you spend more time looking at labels (and returning the packets to the shelves in disgust!) than you do finding food you can eat.
Not everyone who chooses to eat, and not eat, certain foods is crazy, weird, telepathic, strange etc. Often there's a medical reason and without vigilance sickness can follow. Just because you choose healthy doesn't mean you have to go without.
These Lemon Butter Donuts are a great alternative to store bought donuts. They use the Lemon Butter from last week and the addition of extra lemon juice and zest give it a real tangy kick. The frosting of these Lemon Butter Donuts is quite thick and coconut flavoured. Feel free to leave the donuts plain, drizzle them with chocolate or even smother them in lemon curd!
LEMON BUTTER DONUTS
Makes 8
INGREDIENTS
1/4 Cup Lemon Butter (at room temperature)- see below for recipe
1 Tablespoon Maple Syrup
2 Eggs
1/3 Cup Milk (of Choice)
2 Tablespoons Lemon Juice
1 teaspoon Lemon Zest
3/4 teaspoon Baking Powder
dash of Bicarb
1/3 Cup Coconut Flour
Dash of Salt
Optional:
Lemon Frosting (see recipe below)
Poppy or Chia Seeds
INSTRUCTIONS
Preheat the oven to 210C/420F.
Spray a donut pan. If. You don't have a donut pan a cake pop pan, small bundt pan or little muffin tray may also work but cooking times may vary.
In the bowl of a kitchen stand mixer (all these steps can also be done by hand with a spoon and a mixing bowl) beat the lemon butter and maple syrup until combined.
Add the eggs and beat in medium until combined. Stop and scrape down the sides of the bowl 1/2 way through beating to ensure it all gets mixed in.
Add the milk, juice and zest and beat until combined.
In a separate bowl, sift the dry ingredients together.
Add the dry ingredients to the bowl and beat until the mixture is combined and fluffy (about 1 minute).
Transfer the mixture to a piping bag/freezer bag and cut a medium size hole in the corner.
Re spray donut pan. These donuts tend to stick to the pan so over grease!!
Pipe the donut mixture into 8 donuts.
Immediately place in the oven and bake for 10 minutes.
Allow the donuts to cool in the tray for at least 10 minutes before removing.
The donuts can be frosted once cooled.
LEMON FROSTING
INGREDIENTS
4 Tablespoons Coconut Oil,softened
2 Tablespoons Desiccated Coconut
1/2-1 teaspoon Lemon Juice (depending on taste)
1/4 teaspoon of Vanilla Extract
Optional: Maple Syrup to taste
INSTRUCTIONS
Place the coconut oil, coconut, lemon juice and vanilla in a bowl and stir, stir, stir until mixed together.
Taste the frosting and add extra lemon juice or maple syrup as desired.
Spread onto cooled donuts.
Sprinkle with poppy seeds or chia seeds.
LEMON BUTTER
INGREDIENTS
1 Cup Cashews
1 1/2 Cups Desiccated Coconut
1/2 Cup + 1 Tablespoon Lemon Juice
1 Tablespoon + 2 teaspoon Lemon Zest
2 teaspoons Maple Syrup
Optional: dash of Vanilla Extract
INSTRUCTIONS
Place all ingredients into a high powered blender and process until a smooth paste forms.
Place the lemon butter in a sealable container/jar.
The Lemon Butter will need to be at room temperature when using as a spread or in a cookie/donut recipe.

There comes a time in every child's life when friends become more popular than parents.
I'm not talking about the time when your child becomes embarrassed to be seen with you (I'm hoping I've still got a few more good years left before my bogan outfits become a social no go!). I'm talking about when they choose to play with other kids rather than you.
When they no longer choose you.
Sure, they still come to you when they're hungry, bleeding or want to watch Peppa Pig, but you are no longer the play mate of choice. Their words, their clothing choices, the pretend people they talk to are all influenced by other people. Maybe even people who don't wear tracksuit pants or watch reality TV.
It means my babies are growing up and no longer need their Mummy.
Tears.
Many, many tears.
So what's a Mummy without a playmate to do?
Bake cookies.
Eat cookies.
Run lots to burn off cookies.
These 'Lemon Butter' Cookies use the vegan 'Lemon Butter' from the other day. They have only a few ingredients and are so simple to make. They are a soft and chewy cookie that are full of lemon and coconut flavour. They are also Gluten Free, Dairy Free, Refined Sugar Free and Paleo friendly. So, they are pretty much baked little lemon gems!
LEMON BUTTER COOKIES
Makes 10 Cookies
INGREDIENTS
1 Cup 'Lemon Butter' (at room temperature)
1 Egg (small or medium size)
1 teaspoon Bicarb Soda
2 teaspoons Maple Syrup or Honey
Optional; extra Lemon zest if desired.
INSTRUCTIONS
Preheat the oven to 175C/350F.
Grease and line 2 baking trays.
Place all the ingredients in a mixing bowl and stir until fully combined.
If your biceps are a little on the small side, use a blender to combine the ingredients instead.
Place spoonfuls of the cookie dough on the baking tray and flatten slightly.
Allow adequate space around the cookies in case of spreading.
Bake the cookies for 10-12 minutes (10 for soft cookies, longer for crispier but be careful not to burn them).
If using 2 trays cook them separately, otherwise the cookies on the lower shelf will not cook properly.
Allow the cookies to cool on the tray before eating.
LEMON BUTTER
INGREDIENTS
1 Cup Cashews
1 1/2 Cups Desiccated Coconut
1/2 Cup + 1 Tablespoon Lemon Juice
1 Tablespoon + 2 teaspoon Lemon Zest
2 teaspoons Maple Syrup
Optional: dash of Vanilla Extract
INSTRUCTIONS
Place all ingredients into a high powered blender and process until a smooth paste forms.
Place the lemon butter in a seal-able container/jar.
The Lemon Butter will need to be at room temperature when using as a spread or in a cookie/doughnut recipe.

Not everything in my kitchen goes according to plan. You only see the successes; there are many interesting versions along the way.
For example: I was making a Pecan Brittle the other day but didn't let it set long enough before I blended it to make crumbs. Instead of crunchy, toffee nut crumbs I got a gooey ball of unidentified nuttiness (perhaps some might say that is my personality!). As I am determined to not waste food I decided to turn this disaster into Pecan Pie Cookies. The mixture tasted right... but when they came out of the oven the cookies had 'melted' and I was left with a nut 'leather' (that's the only way I can describe it; a protein version of a fruit leather roll up). I thought I had struck accidental genius gold... But alas no. I had baked something that had the ability to pull out tooth fillings with a single bite. It was binned and I chalked it up to a learning experience.
This 'Lemon Butter' did not start out its life with the intention off being a vegan butter option but sometimes when life gives you lemons you find a way to make it taste great! This 'Lemon Butter' is a Vegan and Paleo version of a lemon butter spread. It uses blended cashews and coconut to make a smooth paste which is flavoured by a lot of lemon juice and zest. Spread it on Banana Bread or use it on top of Carrot Cupcakes as a tasty frosting or, as 4 yo H has been doing, eat it by the sneaky spoonful.
I have become quite obsessed with nut butters lately and all the ways you can use them. This 'Lemon Butter' is essentially a flavoured nut butter and later this week I'll show you some tasty ways to use it!
LEMON 'BUTTER'
(Vegan, Paleo)
INGREDIENTS
1 Cup Cashews
1 1/2 Cups Desiccated Coconut
1/2 Cup + 1 Tablespoon Lemon Juice
1 Tablespoon + 2 teaspoon Lemon Zest
2 teaspoons Maple Syrup
Optional: dash of Vanilla Extract
INSTRUCTIONS
Place all ingredients into a high powered blender and process until a smooth paste forms.
Place the lemon butter in a seal-able container/jar.
The Lemon Butter will need to be at room temperature when using as a spread or in a cookie/doughnut recipe.

Today I made a bad decision. A really, really uncomfortable decision. I'm hoping there are no long term side effects.
Today my little crew and I traveled to the city for my nephews 1st Birthday Party. It's a 5 hour round trip and you spend longer in than car than actually at your destination; these are the joys of living in the country!
It's a party so you want to look your best (unfortunately I'm no longer of an age when frilly party dresses are acceptable) so I decided to wear my sexy jeans.
What makes jeans 'sexy jeans' one might ask? It's quite simple:
They must be super, super uncomfortable.
They must cut off the circulation from your waist down and result in permanent redness across your hips.
You must need to lie down to do up the zip, and even then have to do an awkward bum jiggle to ensure that you’re not exposing your underwear.
Instead of walking, you must only be able to shuffle due to the lack of movement in the groin region; and
You cannot eat anything greater than a pea for fear of splitting the seams (so forget about bending over to tie your shoe laces).
Sexy jeans are also not great traveling pants. The prolonged sitting exacerbates the tingling in the toes and I am thankful that I have already used my ovaries, as I am not sure that they would be in working order anymore. On the plus side; my butt looked great and since changing into my beloved 'good' tracksuit pants, I have regained the sensation in my toes.
We women do many (stupid) things in the name of looking good (for further evidence feel free to peruse my shoe cupboard!) and I'm yet to work out if it is appreciated. So why do we do it? Who knows! What I do know is that after a day or night out in high heels, spandex granny pants or ovary destroying pants I can't wait to throw on the trackies and eat something over indulgent; like this Lemon Pistachio Meringue Pie.
This pie is a take on the classic Lemon Meringue Pie; a slightly more adventurous version without losing any of the delicious flavour. Pistachios are a perfect match for the lemon curd, however feel free to use any other nut meal that takes your fancy (for me it usually comes down to what I have I the cupboard). There's no need to bake the meringue (like a classic pie may) as it is infused with Lemon Curd... my weakness!!
LEMON PISTACHIO MERINGUE PIE
(Inspired by Christina Tosi of Mumofokos Milk Bar)
INGREDIENTS
1 Pistachio Pie Crust (see recipe below)
1 Serve Lemon Curd (see recipe below) (divide into 1 1/3 cup and 2/3 cup of curd)
2 Egg Whites
1/4 Cup Maple Syrup
INSTRUCTIONS
Place the cooled Pistachio Pie Crust on a serving plate and fill with 1 1/3 Cup of cooled Lemon curd.
The Curd may need to be gently whisked/stirred if it has become too stiff (this gives you another opportunity to look the deliciousness off the spoon).
Place the filled pie crust in the fridge to allow the curd to re-set for at least 30 minutes.
To make the meringue:
Place the egg whites in the clean bowl of a kitchen stand mixer with a whisk attachment.
Bring the maple syrup and 2 Tablespoons of water to a boil in a small saucepan over medium heat.
Whilst the maple syrup is reaching boiling temperature, begin whisking the eggs on medium until soft peaks are formed.
Slowly pour the boiling mixture down the side of the mixing bowl. DO NOT pour directly onto the egg whites as it may cause them to cook. You may need to turn the whisk to low to prevent hot burning splashes.
Turn the whisk to high and continue to whisk until the mixture has cooled and stiff peaks have formed (this will take 5-7 minutes).
Meanwhile; place the 2/3 cup of Lemon Curd in a bowl and stir to loosen the curd (it may have set in the fridge).
Gently fold the stiff meringue into the curd until the just combined.
Spread the meringue mixture on top of the pie and sprinkle with chopped pistachios.
Serve immediately, or store in the fridge.
This dessert is at its most impressive visually when served straight away as the meringue may collapse slightly; it will still be delicious!!
PISTACHIO PIE CRUST
INGREDIENTS
1/4 cup ground Pistachios (grind whole pistachios in a blender until they become a fine meal)
1/2 cup + 2 tablespoons Coconut Flour (available from health food and specialty stores)
1/4 teaspoon salt
1/4 teaspoon baking soda
1/4 cup Coconut Oil, softened
1/4 cup Maple Syrup (you could substitute honey etc)
1 Egg
1 teaspoon Vanilla Extract
INSTRUCTIONS
Preheat oven to 175C/350F Grease/Spray a 20cm (8 inch) spring form cake tin or pie dish (a 22cm/9inch can also be used).
Mix the dry ingredients in a blender.
In a separate small bowl, whisk together the wet ingredients. Pour the wet ingredients into the dry, and blend until combined. A dough ball will form.
Roll the doughnut between 2 sheets of baking paper and trace a plate/tin bigger than tart tin. Gently place circle in tin. Use excess dough to ensure an even edge.
Alternatively, spread dough evenly in tin and up edges by hand (This is my method of laziest choice!).
Pierce the bottom of pie crust with a knife 4 to 5 times to prevent the dough 'bubbling'.
Bake for 15 minutes and then Cool completely.
If using a spring form tin, remove the crust and place on a serving tray. This may be more difficult if using a pie tin and you may choose to construct the pie and serve from the tin.
LEMON CURD
INGREDIENTS
3 Eggs
2 Egg Yolks
1/2 cup Maple Syrup
Zest of 1 to 2 lemons (start with 1, increase depending on taste)
2/3 cup Lemon Juice
1/2 cup Coconut Oil (softened slightly)
1 3/4 teaspoons Gelatine
INSTRUCTIONS
Whisk the eggs, egg yolks, maple syrup, lemon zest and juice in a heat proof bowl until the mixture is well combined.
Place the bowl over a pan of simmering water. Do not let the bottom of the bowl touch the water.
Add the coconut oil 1 spoonful at a time. Whisk after each addition.
Only add the next spoonful once the previous one has combined.
Stir regularly.
This should take approximately 15 minutes. When done the mixture will be thickened and able to coat the back of the spoon.
Remove the bowl from the double boiler and allow to cool slightly as the gelatine blooms.
Sprinkle the gelatine over 2 Tablespoons of water. Allow to sit for 5 minutes.
Pour the curd and gelatine into a kitchen blender and blender until smooth (this can also be done using a hand blender).
Pour the curd into a bowl, cover with plastic wrap and store in the fridge.
4 yo H is quite concerned that Easter Bunny won't be able to find us this year. We are going to an Easter Festival for the weekend so he has decided to leave Easter Bunny a Note. Knowing H, and his tendency to ramble and over share (wonder where he gets that from?) this is probably what his letter will look like:
Dear Easter Bunny
This year we are not at our home. We are at my crazy Uncle Damien's house.
He used to eat a lot of Spanish rice when he was my age.
Sometimes I like to eat it; I like Sweet and Sour too.
I can't eat it at Kinder though.
Sometimes I eat carrots or eggs.
Please leave my Easter presents at Uncle Damien's for me.
And maybe something for my Brother; but only if you want to.
From H.
These Carrot Cupcakes have been decorated to look like super cute Easter Chickens.
They are a yummy and simple Easter treat to make with the kids. I have used desiccated coconut for the 'feathers' and colored them using natural food colorings (the color comes from Tumeric). The beak is made from carrot and the eyes from cream and cocoa paste, however sultanas can be substituted.
CARROT CUPCAKES (Easter Chicken Cupcakes)
Serves 12
Cupcakes
1/2 cup, packed, Dates
1/4 cup boiling water
Dash of Bicarb
3 Eggs separated
2 Tablespoons Maple Syrup
1 teaspoon Vanilla Extract
150 grams Grated Carrots
100g Apple Sauce (see recipe below)
2/3 cup Coconut Flour
1 teaspoon baking powder
1/2 teaspoon Bicarb soda
1 teaspoon Mixed spice
Zest of 1 Lemon
1/2 cup (- 1/2 Tablespoon) Milk of choice
1/2 Tablespoon Vinegar
For Decorating:
1/2 cup unsweetened Desiccated Coconut
All Natural Yellow food coloring
1 tablespoon Cocoa (or use sultanas)
2-3 Tablespoons Lemon Cream
Carrot
Lemon Cream
1 can of Coconut Cream (400ml can), can placed in fridge overnight
2 1/2 teaspoons Vanilla Extract
1 1/2 teaspoon Maple Syrup
2 1/2 teaspoons Lemon Juice
Zest of 1 Lemon
Apple Sauce
4 apples, peeled and cut into small pieces
3/4 cup water
INSTRUCTIONS
Cupcakes
Preheat oven to 175C/350F
Place dates, boiling water and bicarb in a bowl (making sure dates are covered) and allow to sit and soften (approximately 30 minutes).
Place dates and water in a blender and blend until a smooth date paste is formed.
Place the egg whites in the bowl of a kitchen stand with a whisk attachment fitted.
Whisk on medium/high until soft peaks form.
Add maple syrup 1 tablespoon at a time and continue to whisk on medium/high.
Add purred dates and vanilla extract and whisk on medium/high.
Add egg yolks and whisk until combined.
Place carrots and apple sauce in a blender and blend until combined
With mixer on low add the carrot/apple mix.
Sift dry ingredients together.
Add juice, zest and vinegar to milk.
Add dry ingredients and milk mix alternately whilst whisking on low until combined.
Whisk on medium/high for 1 minute.
Divide evenly amongst 12 greased cupcake liners.
Bake for 22-25 minutes, or until baked through.
Allow to cool in tin for 15 minutes then remove.
Allow to cool completely before frosting with Lemon Cream.
Smooth Lemon Cream onto of each cupcake, retaining 2-3 Tablespoons for the decorations.
Decorations:
Place the coconut in a ziplock bag with a few squirts of food dye and shake the bag until all the coconut is colored.
Put the coconut in a shallow bowl and dip each frosted cupcake in the bowl covering the cream with the colored coconut.
In a small bowl, mix together the cocoa with a small drop of water and stir. Add water one drop at a time until a thick paste is formed.
Pipe/spoon 2 small dots of the reserved coconut cream on the coconut to form the eyes. Use a tooth pick to place a small dot of the cocoa paste in the centre of the cream eye.
Cut the carrot into pieces to use as a beak.
Place the cupcakes in the fridge when not serving.
Lemon Cream
Remove cream can from the fridge and scoop out the thickened cream into the bowl of a kitchen mixer with a whisk attachment. Discard watery component
Whisk on high until thick.
Add extract, maple syrup, juice and zest. Whisk on high until combined.
Store in fridge until required.
Frosted cupcakes will need to be stored in the fridge.
Apple Sauce
Place apples and water in saucepan. Cover with lid.
Bring to boil, then simmer on medium for 7-10 minutes, or until apple is soft.
Store in fridge.
Valentines Day.
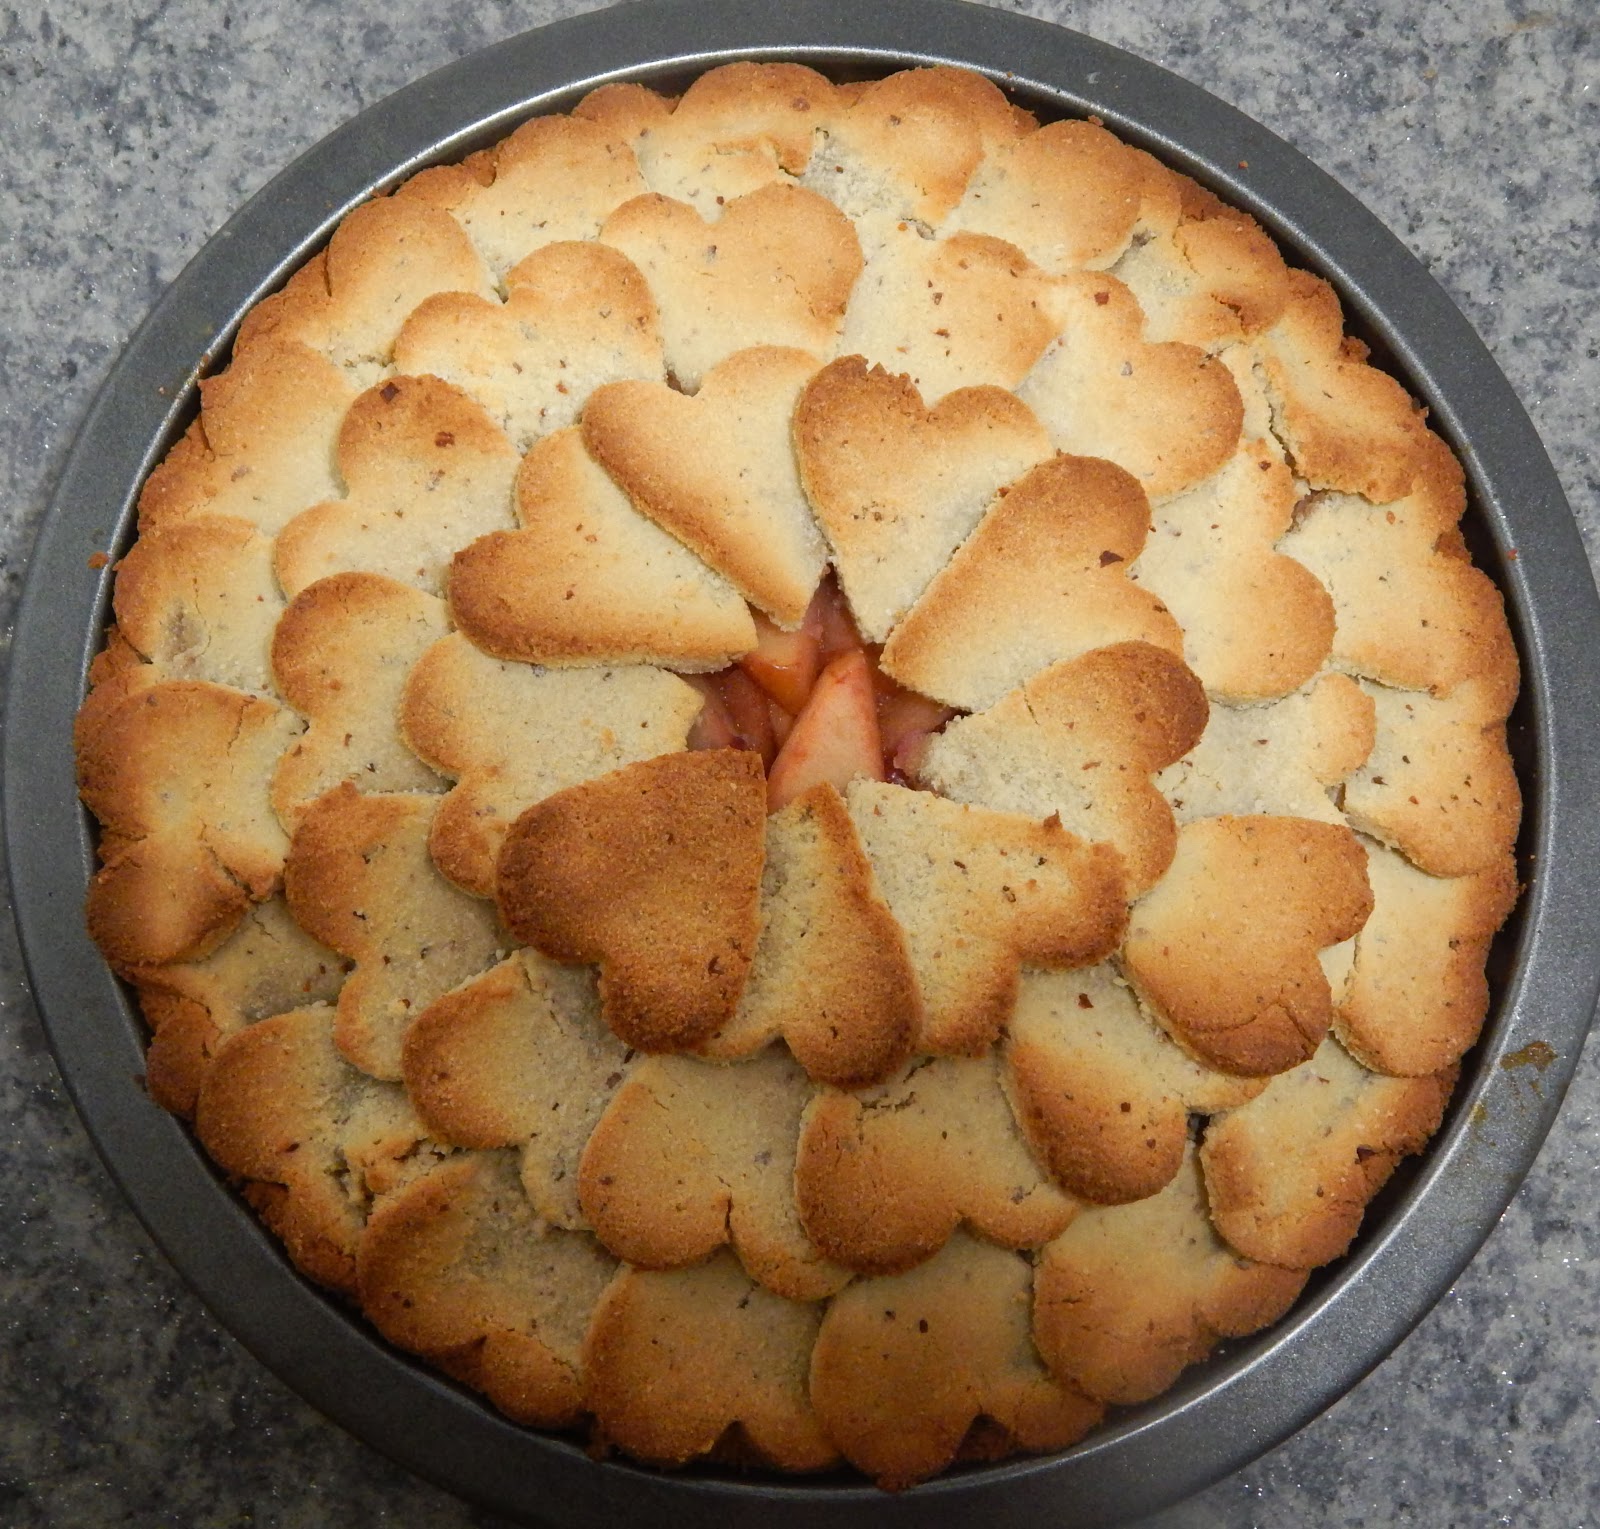
What's more romantic than a pie full of hearts? A stomach full of pie! And such a pretty pie it is.
Thanks to my new addiction to Pinterest I found this idea to turn a simple (yet tasty) pie into a romantic centerpiece, worthy of any loved up occasion. The construction of the pie is not difficult, it just takes some time to cut and place the hearts. I chose apple and strawberry as my flavors (for no other reason than that was all I had in the fridge!) however the strawberries could be substituted for raspberries or blueberries, and the apples for pears.
APPLE AND STRAWBERRY HEART PIE
(inspired by Martha Stewart)
Serves 12, Approximately 240 calories per slice
PIE CRUST
This is a double recipe.
Use 1/2 the recipe as the pie base and the other half as the heart toppers
Adapted from Against All Grain
INGREDIENTS
1/2 cup almond flour
1 cup plus 4 tablespoons coconut flour
1/2 teaspoon salt
1/2 teaspoon baking soda
1/2 cup coconut oil, softened
1/2 cup maple syrup (honey can be used)
2 eggs
2 teaspoon vanilla
INSTRUCTIONS
Pre-heat the oven to 175C/350F.
Grease the bottom of a 18cm/7inch pie tin.
Combine the dry ingredients in a kitchen blender and process on low until combined.
Add the wet ingredients and blend until the dough comes together.
Wrap the dough in plastic wrap.
Place the dough in the fridge for a minimum of 1 hour.
After 1 hour separate the dough into 2 equal parts. Wrap one ball of dough again and place in the fridge.
Press the remaining dough into the tin, pressing the dough up the edges of the tin to create a wall.
Pierce the bottom of the pastry 10 times.
Place in the oven for 7 minutes.
Allow the pie to cool.
Remove the 2nd ball of dough from the fridge.
Roll out the dough on a greased bench or on baking paper.
Using a 5cm H x 3cm W sized heart cutter, cut out 45 hearts (there may be a couple left over but it's safer to have more than less).
Place the hearts in the fridge until ready to use.
APPLE AND STRAWBERRY FILLING
INGREDIENTS
500 grams of Apple (measured before cutting), peeled, cored and diced
1/4 cup water
2 Tablespoons Maple Syrup (or Honey)
Zest of 1/2 lemon
300 grams Strawberries, hulled and cut into large segments (frozen or fresh is fine)
INSTRUCTIONS
Per heat the oven to 175C/350F
Place the apple, water, maple syrup and zest in a saucepan.
Simmer, with lid on, for 10-12 minutes, or until the apple is soft.
Stir in strawberries and allow to cool.
Once cooled, drain the excess liquid from the fruit mixture.
Spoon the drained mixture into the cooled pie crust.
Brush water over the edge of the pie crust.
Arrange the cut hearts around the edge of the pie, gently pushing the hearts into the pie crust to join.
Once the outside circle is complete move to the middle circle and place hearts concentrically around, joining and overlapping as per the first layer.
Complete the inner circle last.
Brush the hearts lightly with water and lightly press the overlaps together.
Place the pie in the oven for 20-25, or until the hearts start to brown (but not burn).
Allow to cool for 10 minutes before serving or wait and serve cold.
Serve with Whipped Coconut Cream.

You know when are reading a magazine and you see something you really want. You start to drool, you start to imagine what it would look like in the flesh, you can't stop thinking about it (I'm referring here to food magazines but the same reaction could apply to shoes or crochet patterns... yep I'm weird!).
You have to have it... only it contains all the ingredients that would make you feel less than well. Back to the carrot sticks! HELL NO I say!
This month’s Taste Magazine had an Australian Day dessert Challenge set by non other than the amazing Adriano Zumbo, patisserie extraordinaire! It's called the PAVLINGTON- a cross between a lamington and a pavlova. I like to think of it as a dessert platypus; all the good bits combined to make a super dessert (without the webbed feet!).
So Australian! So Tasty; and now it's all mine! I have made some changes to the original Taste Magazine recipe. Instead of 4 small square cakes I have made 1 large cake and, of course, made it Gluten, Dairy and Processed Sugar free.
The Pavlington Cake is a bit time consuming, but totally worth it! All the elements are simple to make, and the construction is straightforward but it pays to start early. The sponge, curd, gel and cream can be made the day before. If possible, make the meringue layer the day of construction as it may soften and weep. This Pavlington Cake is like a trifle in cake form. It is so soft and gooey and the lemon curd will ooze out of the cut pieces. Delicious!
So, the most awesome thing happened today (other than having a piece of Pavlington for breakfast!). I tweeted a photo of a slice of Pavlington today and it was favourited by Adriano Zumbo! The master inventor of the Pavlington himself! Best, and most tasty, AUSTRALIA DAY EVER!!!
Due to the sheer number of photos taken to create a stp-by-step guide, I've had to put them all on Pinterest here

PAVLINGTON CAKE - ode to ZUMBO!
(adapted and inspired by taste.com.au and Adriano Zumbo)
Makes 16 serves
There are several parts to this cake.
Make each part (except for the chocolate coating) then begin construction.
The sponge, lemon curd, whipped coconut cream and raspberry gel can be made up to 2 days ahead.
You will require a 20cm/8inch spring form cake tin for cake construction
SPONGE CAKE
INGREDIENTS
9 eggs, separated
3/4 cup Maple Syrup
3/4 cup Coconut Flour
3 teaspoons Baking Powder
1 1/2 Tablespoons Vanilla Extract
INSTRUCTIONS
Preheat the oven to 175C/350F
Grease and line 2 20cm circular cake tins (for the base and top) and 2 20 cm square cake tins (to form the walls). Alternatively, a large baking tray could be used instead of the 2square tins. The square cakes will be cut into strips to form the walls of the Pavlington Cake.
Add the egg whites to the bowl of a kitchen stand mixer with a whisk attachment (alternatively use hand beaters).
Whisk on the egg whites on medium until soft peaks form.
Slowly add the maple syrup to the egg whites, 1 tablespoon at a time, whilst still whisking on medium.
Add the Vanilla Extract then the egg yolks, whilst whisking on medium.
In a separate bowl soft the coconut flour and baking powder together.
Add the dry ingredients to the wet, folding them in gently.
Do not over fold or whisk as too much air will be lost and the sponge will be tough and flat.
Evenly pour the sponge mixture between the 4 lined and greased cake tins.
Bake for 8-10 min, or until golden and cooked through.
Remove the trays from the oven.
Allow the sponges to cool before removing from the tins.
LEMON CURD
INGREDIENTS
3 eggs
2 egg yolks
1/2 cup Maple Syrup
Zest of 1 to 2 lemons (start with 1, increase depending on taste)
2/3 cup Lemon Juice, strained
1/2 cup coconut oil (softened slightly)
INSTRUCTIONS
Whisk the eggs, egg yolks, maple syrup, lemon zest and juice in a heat proof bowl until the mixture is well combined.
Place the bowl over a pan of simmering water. Do not let the bottom of the bowl touch the water.
Add the coconut oil 1 spoonful at a time. Whisk after each addition.
Only add the next spoonful once the previous one has combined.
Stir regularly.
This should take approximately 15 minutes. When done the mixture will be thickened and able to coat the back of the spoon.
Cool and place in a glass container. Store in the fridge.
WHIPPED COCONUT CREAM
INGREDIENTS
1 can Canned Coconut Cream, lid removed and placed in the fridge over night
2 teaspoons Vanilla Extract
2 teaspoons Maple Syrup
INSTRUCTIONS
Spoon the thickened cream out of the can, discarding the watery remains.
Place the coconut cream, maple syrup and vanilla extract in a mixing bowl and whisk on high until thickened. The key is to forget about the cream and leave it to whip for at least 5 minute. Place the whipped cream back in the fridge to thicken before using.
RASPBERRY GEL
INGREDIENTS
500 grams frozen raspberries, thawed (keep the juices)
2 Tablespoons Maple Syrup
1 teaspoon Gelatin
1 teaspoon lemon juice
INSTRUCTIONS
Place the thawed raspberries in a blender and purée until smooth.
Pass the purée through a sieve, using the back of a spoon to press out as much juice as possible into a bowl. (I passed the purée through the sieve twice)
At this point measure the raspberry juice that you have collected.
If 1 cup, use 1 teaspoon of gelatin; if 1 1/2 cups, use 1 1/2 teaspoons of gelatin.
Place the juice, maple syrup and gelatin in a saucepan over medium heat and bring to a rolling boil.
Add the lemon juice and mix well.
Pour into a heat proof bowl, cover and keep in the fridge.
MERINGUE
INGREDIENTS
2 egg whites
1/2 cup Maple Syrup
1 teaspoon Vanilla Extract
1/2 teaspoon Vinegar
2 teaspoon Arrowroot
INSTRUCTIONS
Preheat the oven to 130C/260F
Draw 2 18cm (7 1/4 inch) circles on baking paper.
Place the 2 baking paper circles on 2 trays, pencil side down.
Lightly grease.
Place the egg whites in a mixing bowl and whisk on medium until soft peaks form.
Slowly add the maple syrup, 1 tablespoon at a time, until stiff peaks form.
Add the vanilla extract and whisk until combined.
Sift the Arrowroot over the meringue mixture.
Add the vinegar and gently fold in.
Evenly divide the meringue mixture between the 2 circles.
Use an offset spatula or flat knife to spread the mixture evenly over the traced circle until about 1.5cm thick.
Bake for 15-17 minutes, or until a slight golden crust forms on top. The meringue will still be soft and gooey in side.
Allow to cool.
CONSTRUCTION
INGREDIENTS
8-9 strawberries, hulled and cut into pieces
Small handful of blueberries
INSTRUCTIONS
Line a 20cm/8inch Springform cake tin with baking paper. Cut the baking paper and line the edges of the tin also.
Place one of the circle sponges on the bottom of the tin.
Cut the square sponges into long strips and line the sides of the tin. My cake was 6.5cm high, so the strips needed to be approximately that high.
Ensure that there are no gaps (it doesn't matter if the edges resemble more of a patchwork quilt than a sturdy wall as they will be covered by chocolate).
Stir and loosen the raspberry gel.
Spread 1/2 the gel over the bottom sponge.
Place 1/2 the Whipped Coconut Cream in a piping bag and thinly pipe over the raspberry gel (this prevents the gel and cream from mixing). Use a palette knife to gently spread the cream to cover the Raspberry gel.
Place the meringue on top of the cream, trimming it to fit if required.
Spread 1/2 the curd over the meringue.
Sprinkle strawberries and blueberries over the curd.
Top with the remaining curd.
Place the meringue layer on top of the curd.
Spread the remaining raspberry gel on top of the meringue.
Pipe the remaining whipped coconut cream on top of the raspberry gel, and gently spread to cover the gel.
Place the circle sponge on top, trimming the edges of the sponge walls if required.
Place the tin in the fridge for at least 2 hours (I left mine overnight and it was fine) and then in the freezer for 1 hour before coating in the Chocolate sauce.
CHOCOLATE COATING
INGREDIENTS
1/2 cup + 1 tablespoon Maple Syrup
3/4 cup Cocoa
1/2 cup Water
1/2 cup Coconut Cream
2 teaspoons Vanilla Extract
2 1/2 teaspoons Gelatine
2 Tablespoons Water
1 cup Desiccated Coconut
INSTRUCTIONS
Place all ingredients (except for the Gelatin, 2 Tablespoons of water and Coconut) in a saucepan and bring to a rolling boil over medium heat, stirring continuously.
Boil for 2 minutes, stirring continuously. The mixture will be shiny and thickened.
Take off the heat and allow to sit for 3 minutes.
Meanwhile, sprinkle the gelatin over 2 tablespoons of water and allow to sit for 5 minutes.
Add the gelatin mixture to the chocolate and whisk until dissolved.
Allow to sit for 3 minutes.
Remove the Pavlington Cake from the freezer and gently remove from the springform tin.
Place the Pavlington on a wire rack over a baking tray (this catches the chocolate drips- the left overs taste awesome!).
Pour the Chocolate coating evenly over the Pavlington.
Use a metal spatula (or flat knife) to spread the coating over the side edges of the coat. Do this 2-3 times to get an even covering.
If necessary, reuse the chocolate that has dripped into the tray.
Once the sponge is completely covered sift the coconut over the top and sides (you may need to get messy and throw the coconut over the sides).
Return to the fridge and allow to set for at least 1 hour before serving.
Very carefully, transfer to a serving plate before serving.
Keep in the fridge.


Today is my birthday... and I made myself 3 birthday cakes, cupcakes, honey joys, chocolate crackles and enough whipped coconut cream and caramel to last 'til my next birthday!
Before you start to judge my excess cake consumption let me point out that a) I did share my cakes with family and friends; b) they were all gluten/dairy/coloring/processed sugar free; and c) it's my birthday so I can eat as much cake as I want! It is my belief that your own birthday cake does not contain any calories... which is why I made 3! Just in case the calories start to count the day after your birthday I made sure I finished the left over cake for dinner.
Birthdays as an adult are a bit odd. Birthdays before you turn 30 are a sign that you are growing up; whilst after 30 it's a sign that you are getting old! There's not the hype and anticipation that you have as a child. I remember being way too excited to go to sleep the night before my birthday; which unfortunatly always led to a grumpy birthday girl.
For my birthday this year I wanted to prove that you could have all the birthday trimmings without the birthday nasties. The party food contained no gluten/dairy/processed sugars or food colorings, plus there were hidden fruits and vegetables. This also meant that as Mums we didn't have to limit the kids to only 1 of each treat and they didn't go hyper on food colorings. There's nothing worse than a bunch of crazy 3 year old boys, a train set and a dinosaur costume.
The first of my birthday cakes is a 4 Layered Lemon Cake. It's tasty and pretty, especially if you love Lemon! Make the lemon curd and cream ahead of time to allow it to thicken in the fridge first. Also refridgerate the constructed cake to allow it to hold together better. The cake recipe listed is for 1 cake; you will need to make 2 cakes (therefore use 12 eggs).
HAPPY BIRTHDAY TO ME!!
LAYERED LEMON CAKE*****Updated 29/9/2013
(ingredients listed are for 1 lemon cake. Please make 2 cakes separately. As the eggs are whisked til quite large most mixing bowls will not be large enough to accomadate 12 eggs at once)
INGREDIENTS
(for one lemon cake; make 2 seperate cakes)
6 eggs, separated
1/2 cup maple syrup minus 1 tablespoon(can substitute other sweeteners but will change taste and cooking time)
1 teaspoon vanilla extract
1/2 cup water
3/4 cup coconut flour
3 teaspoons baking powder
Rind of 1 lemon
2 tablespoons of lemon juice
Lemon Curd (see recipe below)
Whipped Coconut Cream (see recipe below)
INSTRUCTIONS
Preheat oven to 175C/350F
Place egg whites in a clean mixing bowl and whisk on medium/high until soft peaks form.
Slowly add the maple syrup; 1 spoonful at a time.
Mixture will triple in size and form peaks.
Add vanilla and whisk on medium/high until combined.
Turn whisk to medium and add egg yolks, 1 at a time. Add next yolk only once the previous one has been combined.
Return whisk to high and slowly add the water and lemon juice/zest.
In a separate bowl, sift the coconut flour and baking powder together 3 times.
With the mixer on low, add the dry mixture and whisk until combined (you made need to scrape down the edges to ensure the coconut flour is combined)
Return whisk to high and mix for 30-60 seconds until fluffy.
Pour into a greased and lined 20cm/8 inch cake tin.
Bake for 30-35 minutes, or until cooked.
Remember to cook 2 cakes for the layered cake (you will therefore need 12 eggs)
Allow the cakes to cool completely then cut each cake in half. You will now have 4 layers.
Place the first layer on your saving tray. Spread generously with whipped coconut cream.
Place next cake layer on top of cream.
Spread the lemon curd generously over the 2nd layer of cake.
Place next layer of cake on top of lemon curd.
Spread the whipped coconut cream generously over the 3rd layer of cake.
Place next layer of cake on top of the cream.
Decorate the top of the cake with curd and/or berries.
Refridgerate before serving.

Lemon Curd
Makes 2 cups (500 grams)
INGREDIENTS
3 eggs
2 egg yolks
1/2 cup Maple Syrup
Zest of 1 to 2 lemons (start with 1, increase depending on taste)
Juice of 3 lemons (approximately 2/3 cup)
1/2 cup (120 grams) coconut oil (softened slightly)
INSTRUCTIONS
Whisk the eggs, egg yolks, maple syrup, lemon zest and juice in a heat proof bowl until the mixture is well combined.
Place the bowl over a pan of simmering water. Do not let the bottom of the bowl touch the water.
Add the coconut oil 1 spoonful at a time. Whisk after each addition.
Only add the next spoonful once the previous one has combined.
Stir regulary.
This should take approximately 15 minutes. When done the mixture will be thickened and able to coat the back of the spoon.
Cool and place in a glass container. Store in the fridge.

Coconut Whipped Cream
INGREDIENTS
1 can organic Coconut cream (see above notes on types of coconut creams), opened and in fridge for min 5 hours
1-2 teaspoons maple syrup
1-2 teaspoons vanilla extract
INSTRUCTIONS
Scoop the thickened cream from the tin, discarding the watery liquid at the bottom.
Place cream in mixing bowl and beat using whisk attachment.
Add maple syrup and vanilla to taste and continue whisking until thick.
Depending on your taste buds you may require more sweetener.
Keep refridgerated.


